Building a Space Shooter Game that Syncs with Unity and MongoDB Realm
When developing a game, in most circumstances you’re going to need to store some kind of data. It could be the score, it could be player inventory, it could be where they are located on a map. The possibilities are endless and it’s more heavily dependent on the type of game.
Need to sync that data between devices and your remote infrastructure? That is a whole different scenario.
If you managed to catch MongoDB .Live 2021, you’ll be familiar that the first stable release of the MongoDB Realm SDK for Unity was made available. This means that you can use Realm in your Unity game to store and sync data with only a few lines of code.
In this tutorial, we’re going to build a nifty game that explores some storage and syncing use-cases.
To get a better idea of what we plan to accomplish, take a look at the following animated image:
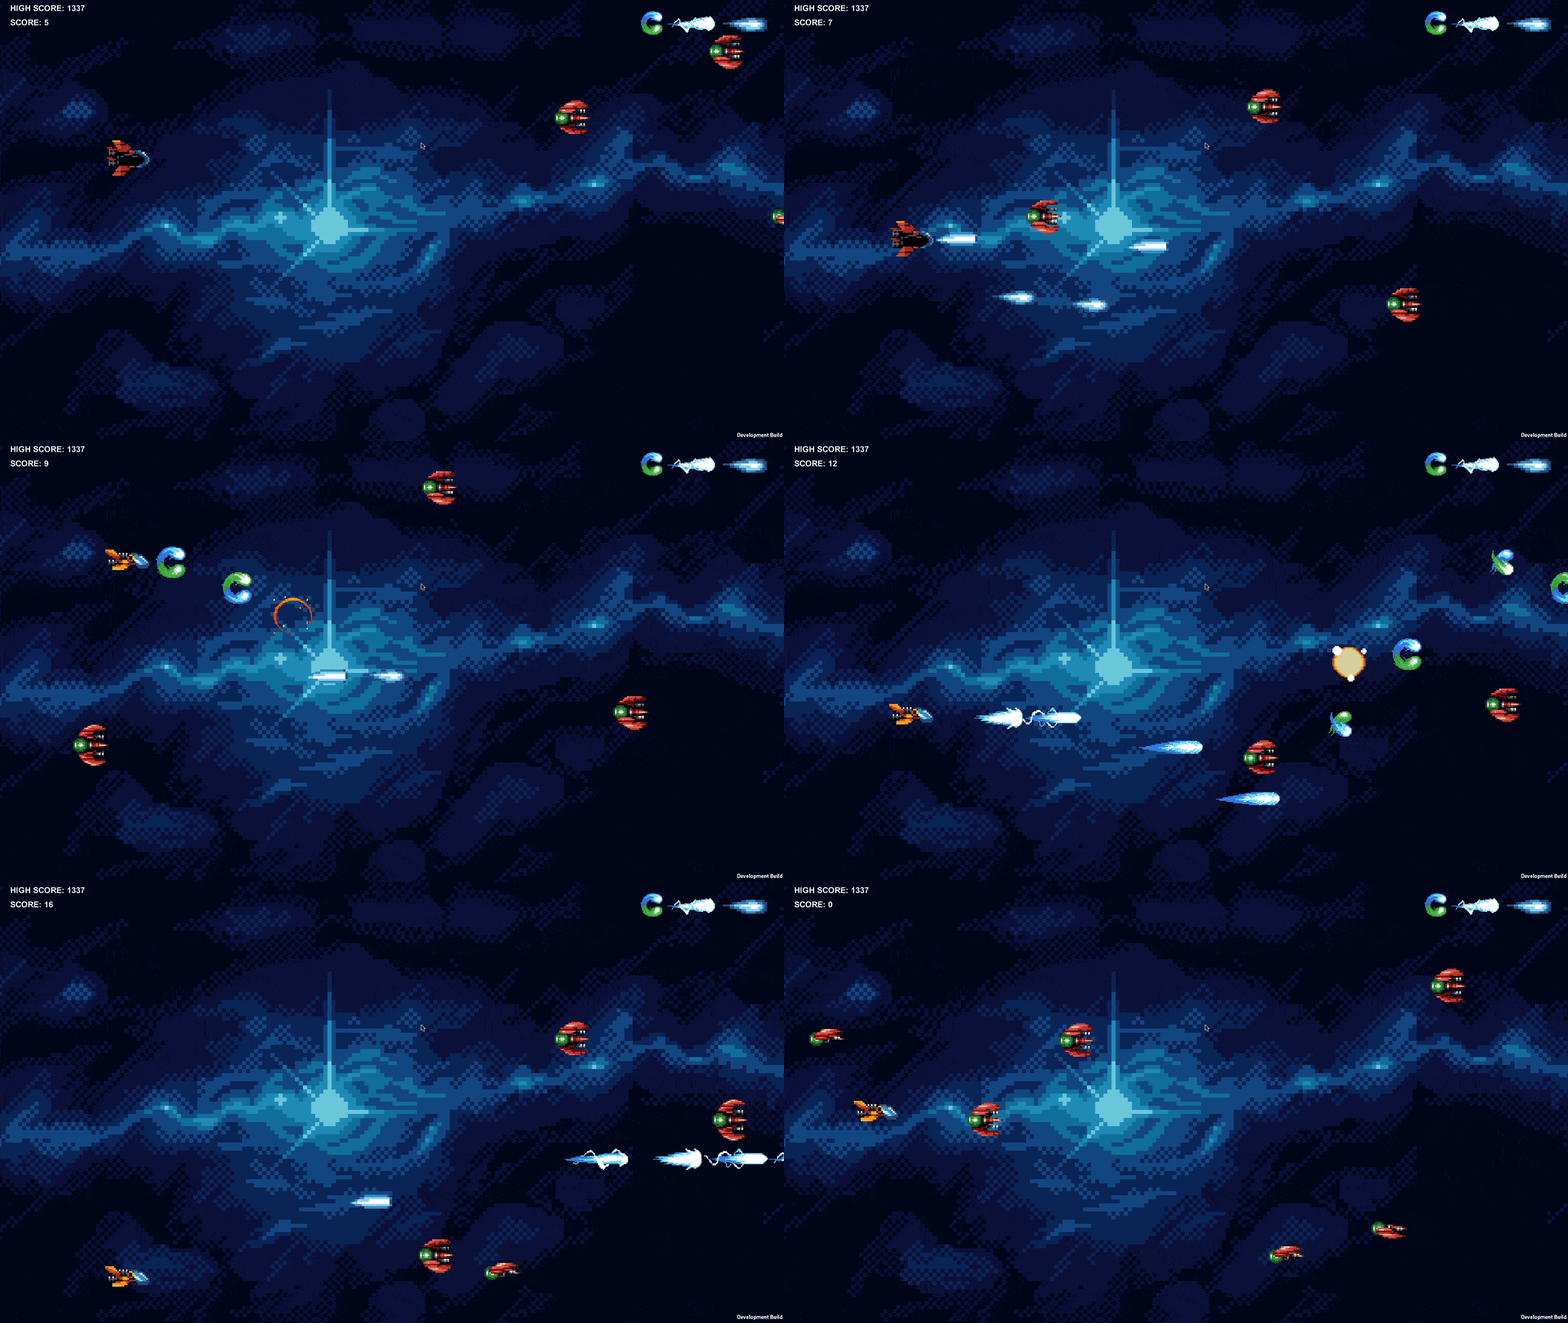
In the above example, we have a space shooter style game. Waves of enemies are coming at you and as you defeat them your score increases. In addition to keeping track of score, the player has a set of enabled blasters. What you don’t see in the above example is what’s happening behind the scenes. The score is synced to and from the cloud and likewise are the blasters.
The Requirements
There are a lot of moving pieces for this particular gaming example. To be successful with this tutorial, you’ll need to have the following ready to go:
- Unity 2021.2.0b3 or newer
- A MongoDB Atlas M0 cluster or better
- A Realm web application pointed at the Atlas cluster
- Game media assets
This is heavily a Unity example. While older or newer versions of Unity might work, I was personally using 2021.2.0b3 when I developed it. You can check to see what version of Unity is available to you using the Unity Hub software.
Because we are going to be introducing a synchronization feature to the game, we’re going to need an Atlas cluster as well as a Realm application. Both of these can be configured for free with the MongoDB Cloud. Don’t worry about the finer details of the configuration because we’ll get to those as we progress in the tutorial.
As much as I’d like to take credit for the space shooter assets used within this game, I can’t. I actually downloaded them from the Unity Asset Store. Feel free to download what I used or create your own.
If you’re looking for a basic getting started tutorial for Unity with Realm, check out my previous tutorial on the subject.
Designing the Scenes and Interfaces for the Unity Game
The game we’re about to build is not a small and quick project. There will be many game objects and a few scenes that we have to configure, but none of it is particularly difficult.
To get an idea of what we need to create, make note of the following breakdown:
- LoginScene
- Camera
- LoginController
- RealmController
- Canvas
- UsernameField
- PasswordField
- LoginButton
- MainScene
- GameController
- RealmController
- Background
- Player
- Canvas
- HighScoreText
- ScoreText
- BlasterEnabled
- SparkBlasterEnabled
- CrossBlasterEnabled
- Blaster
- CrossBlast
- Enemy
- SparkBlast
The above list represents our two scenes with each of the components that live within the scene.
Let’s start by configuring the LoginScene with each of the components. Don’t worry, we’ll explore the logic side of things for this scene later.
Within the Unity IDE, create a LoginScene and within the Hierarchy choose to create a new UI -> Input Field. You’ll need to do this twice because this is how we’re going to create the UsernameField and the PasswordField that we defined in the list above. You’re also going to want to create a UI -> Button which will represent our LoginButton to submit the form.
For each of the UI game objects, position them on the screen how you want them. Mine looks like the following:
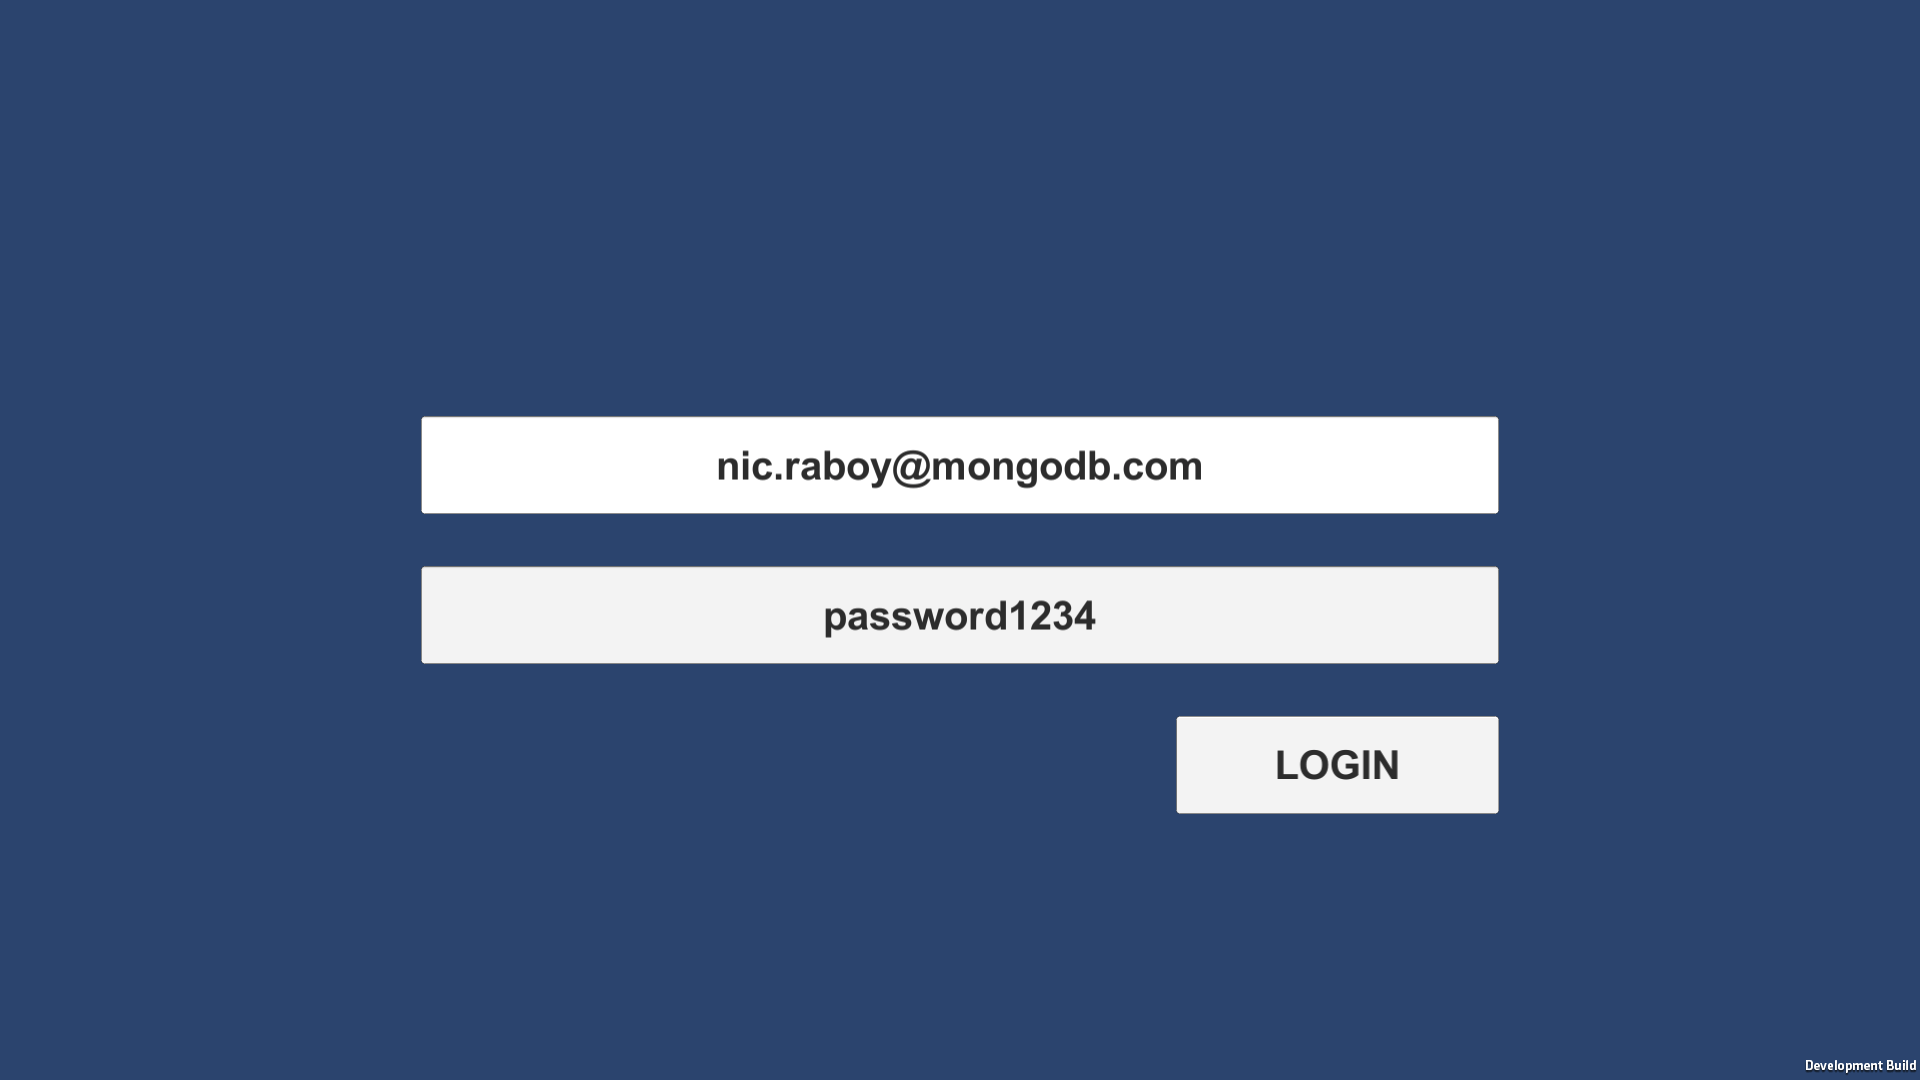
Within the Hierarchy of your scene, create two empty game objects. The first game object, LoginController, will eventually hold a script for managing the user input and interactions with the UI components we had just created. The second game object, RealmController, will eventually have a script that contains any Realm interactions. For now, we’re going to leave these as empty game objects and move on.
Now let’s move onto our next scene.
Create a MainScene if you haven’t already and start adding UI -> Text to represent the current score and the high score.
Since we probably don’t want a solid blue background in our game, we should add a background image. Add an empty game object to the Hierarch and then add a Sprite Renderer component to that object using the inspector. Add whatever image you want to the Sprite field of the Sprite Renderer component.
Since we’re going to give the player a few different blasters to choose from, we want to show them which blasters they have at any given time. For this, we should add some simple sprites with blaster images on them.
Create three empty game objects and add a Sprite Renderer component to each of them. For each Sprite field, add the image that you want to use. Then position the sprites to a section on the screen that you’re comfortable with.
If you’ve made it this far, you might have a scene that looks like the following:

This might be hard to believe, but the visual side of things is almost complete. With just a few more game objects, we can move onto the more exciting logic things.
Like with the LoginScene, the GameController and RealmController game objects will remain empty. There’s a small change though. Even though the RealmController will eventually exist in the MainScene, we’re not going to create it manually. Instead, just create an empty GameController game object.
This leaves us with the player, enemies, and various blasters.
Starting with the player, create an empty game object and add a Sprite Renderer, Rigidbody 2D, and Box Collider 2D component to the game object. For the Sprite Renderer, add the graphic you want to use for your ship. The Rigidbody 2D and Box Collider 2D have to do with physics and collisions. We’re not going to burden ourselves with gravity for this example, so make sure the Body Type for the Rigidbody 2D is Kinematic and the Is Trigger for the Box Collider 2D is enabled. Within the inspector, tag the player game object as “Player.”
The blasters and enemies will have the same setup as our player. Create new game objects for each, just like you did the player, only this time select a different graphic for them and give them the tags of “Weapon” or “Enemy” in the inspector.
This is where things get interesting.
We know that there will be more than one enemy in circulation and likewise with your blaster bullets. Rather than creating a bunch of each, take the game objects you used for the blasters and enemies and drag them into your Assets directory. This will convert the game objects into prefabs that can be recycled as many times as you want. Once the prefabs are created, the objects can be removed from the Hierarchy section of your scene. As we progress, we’ll be instantiating these prefabs through code.
We’re ready to start writing code to give our game life.
Configuring MongoDB Atlas and MongoDB Realm for Data Synchronization
For this game, we’re going to rely on a cloud and synchronization aspect, so there is some additional configuration that we’ll need to take care of. However, before we worry about the cloud configurations, let’s install the Realm SDK for Unity.
Within Unity, select Window -> Package Manager and then click the little cog icon to find the Advanced Project Settings area.
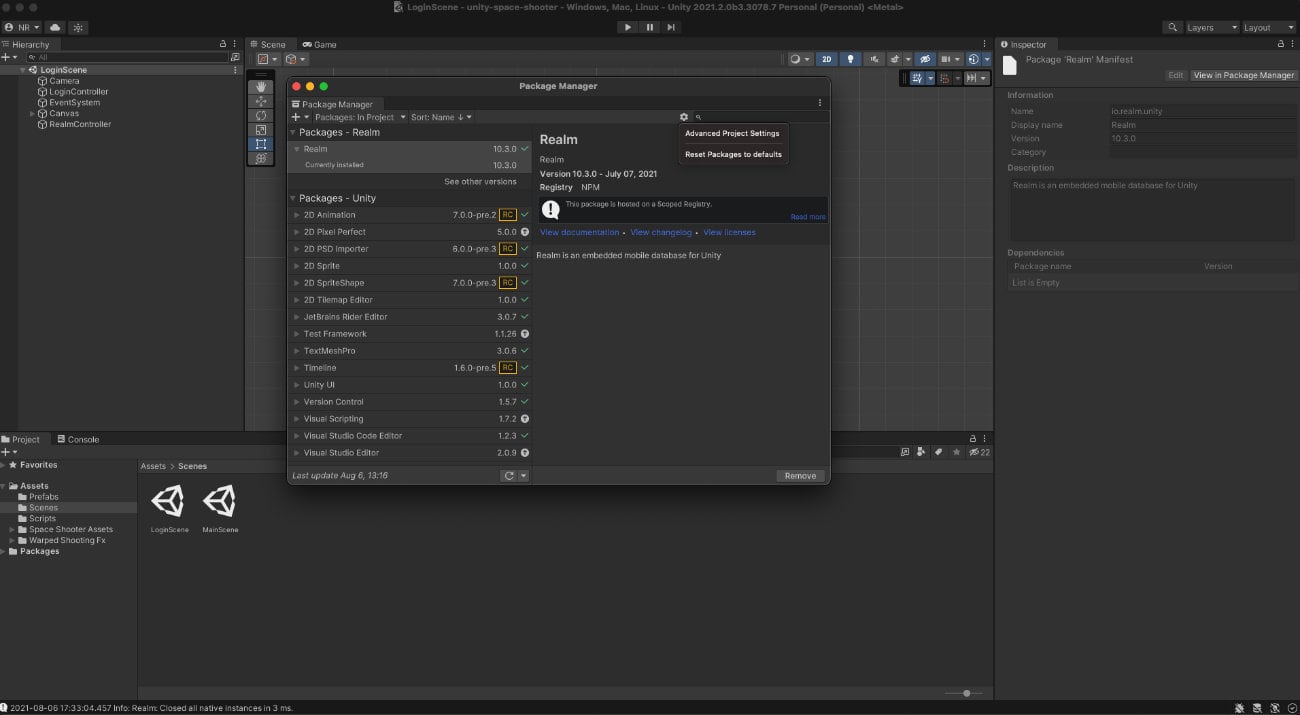
Here you’re going to want to add a new registry with the following information:
name: NPM
url: https://registry.npmjs.org
scope(s): io.realm.unity
Even though we’re working with Unity, the best way to get the Realm SDK is through NPM, hence the custom registry that we’re going to use.
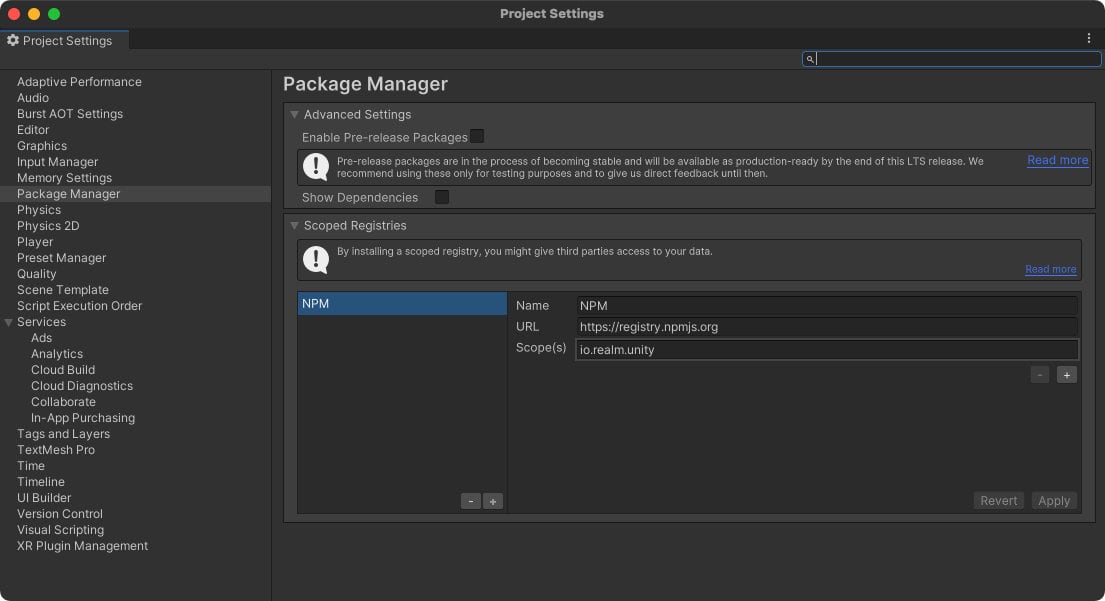
With the registry added, we can add an entry for Realm in the project’s Packages/manifest.json file. Within the manifest.json file, add the following to the dependencies object:
"io.realm.unity": "10.3.0"
You can swap the version of Realm with whatever you plan to use.
From a Unity perspective, Realm is ready to be used. Now we just need to configure Realm and Atlas in the cloud.
Within the MongoDB Cloud, assuming you already have a cluster to work with, click the Realm tab and then Create a New App to create a new Realm application.
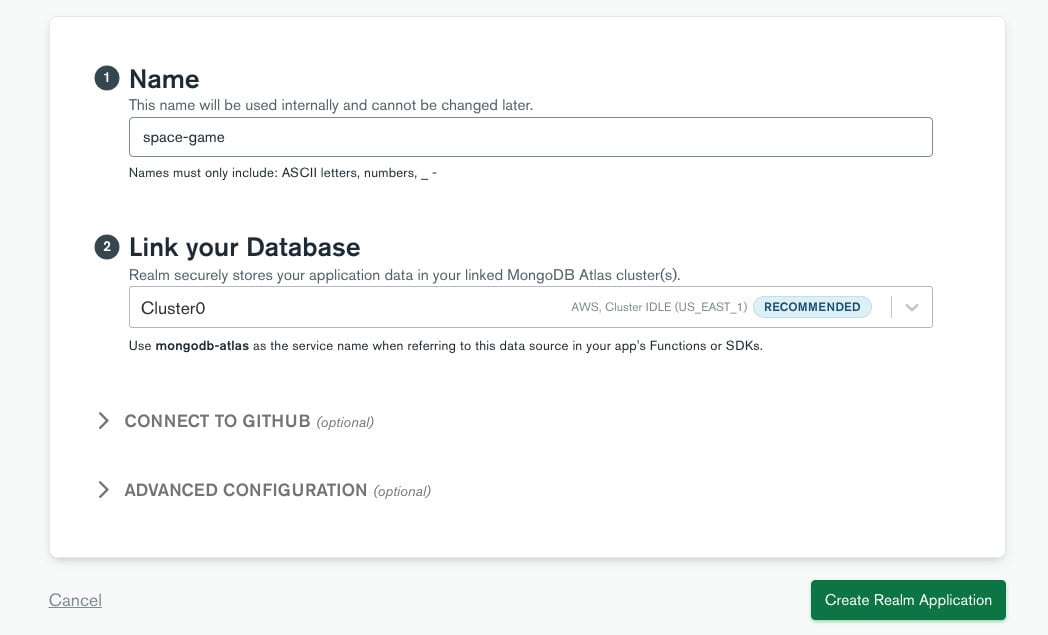
Name the Realm application whatever you’d like. The MongoDB Atlas cluster requires no special configuration to work with Realm, only that such a cluster exists. Realm will create the necessary databases and collections when the time comes.
Before we start configuring Realm, take note of your Realm App Id in the top left corner of the screen:
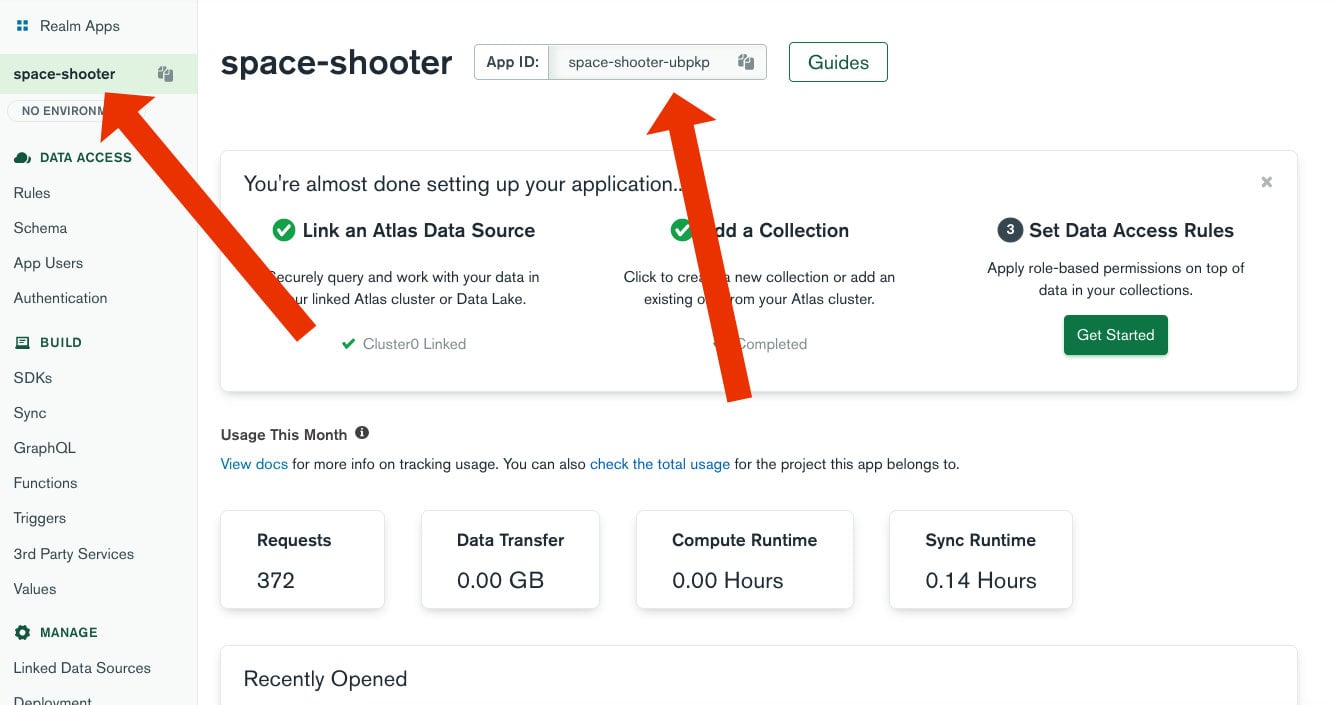
The Realm App Id will be very important within the Unity project because it tells the SDK where to sync and authenticate with.
Next you’ll want to define what kind of authentication is allowed for your Unity game and the users that are allowed to authenticate. Within the Realm dashboard, click the Authentication tab followed by the Authentication Providers tab. Enable Email / Password if it isn’t already enabled. After email and password authentication is enabled for your application, click the Users tab and choose to Add New User with the email and password information of your choice.
The users can be added through an API request, but for this example we’re just going to focus on adding them manually.
With the user information added, we need to define the collections and schemas to sync with our game. Click the Schema tab within the Realm dashboard and choose to create a new database and collection if you don’t already have a space_shooter database and a PlayerProfile collection.
The schema for the PlayerProfile collection should look like the following:
{
    "title": "PlayerProfile",
    "bsonType": "object",
    "required": [
        "high_score",
        "spark_blaster_enabled",
        "cross_blaster_enabled",
        "score",
        "_partition"
    ],
    "properties": {
        "_id": {
            "bsonType": "string"
        },
        "_partition": {
            "bsonType": "string"
        },
        "high_score": {
            "bsonType": "int"
        },
        "score": {
            "bsonType": "int"
        },
        "spark_blaster_enabled": {
            "bsonType": "bool"
        },
        "cross_blaster_enabled": {
            "bsonType": "bool"
        }
    }
}
In the above schema, we’re saying that we are going to have five fields with the types defined. These fields will eventually be mapped to C# objects within the Unity game. The one field to pay the most attention to is the _partition field. The _partition field will be the most valuable when it comes to sync because it will represent which data is synchronized rather than Realm attempting to synchronize the entire MongoDB Atlas collection.
In our example, the _partition field should hold user email addresses because they are unique and the user will provide them when they log in. With this we can specify that we only want to sync data based on the users email address.
With the schema defined, now we can enable Realm Sync.
Within the Realm dashboard, click on the Sync tab. Specify the cluster and the field to be used as the partition key. You should specify _partition as the partition key in this example, although the actual field name doesn’t matter if you wanted to call it something else. Leaving the permissions as the default will give users read and write permissions.
Realm Sync will only sync collections that have a defined schema within Realm. You could have other collections in your MongoDB Atlas cluster, but they won’t sync automatically unless you have schemas defined for them.
At this point, Realm is configured in Unity and Realm is configured for synchronization of data. We can now focus on the actual game development.
Defining the Realm Data Model and Usage Logic
When it comes to data, Realm is going to manage all of it. We need to create a data model that matches the schema that we had just created for synchronization and we need to create the logic for our RealmController game object.
Let’s start by creating the model to be used.
Within the Assets folder of your project, create a Scripts folder with a PlayerProfile.cs script in it. The PlayerProfile.cs script should contain the following C# code:
using Realms;
using Realms.Sync;

public class PlayerProfile : RealmObject {

    [PrimaryKey]
    [MapTo("_id")]
    public string UserId { get; set; }

    [MapTo("high_score")]
    public int HighScore { get; set; }

    [MapTo("score")]
    public int Score { get; set; }

    [MapTo("spark_blaster_enabled")]
    public bool SparkBlasterEnabled { get; set; }

    [MapTo("cross_blaster_enabled")]
    public bool CrossBlasterEnabled { get; set; }

    public PlayerProfile() {}

    public PlayerProfile(string userId) {
        this.UserId = userId;
        this.HighScore = 0;
        this.Score = 0;
        this.SparkBlasterEnabled = false;
        this.CrossBlasterEnabled = false;
    }

}
What we’re doing is we are defining object fields and how they map to a remote document in a MongoDB collection. While our C# object looks like the above, the BSON that we’ll see in MongoDB Atlas will look like the following:
{
    "_id": "12345",
    "high_score": 1337,
    "score": 0,
    "spark_blaster_enabled": false,
    "cross_blaster_enabled": false
}
It’s important to note that the documents in Atlas might have more fields than what we see in our game. We’ll only be able to use the mapped fields in our game, so if we have for example an email address in our document, we won’t see it in the game because it isn’t mapped.
With the Realm model in place, we can focus on syncing, querying, and writing our data.
Within the Assets/Scripts directory, add a RealmController.cs script. This script should contain the following C# code:
using System.Collections;
using System.Collections.Generic;
using UnityEngine;
using Realms;
using Realms.Sync;
using Realms.Sync.Exceptions;
using System.Threading.Tasks;

public class RealmController : MonoBehaviour {

    public static RealmController Instance;

    public string RealmAppId = "YOUR_REALM_APP_ID_HERE";

    private Realm _realm;
    private App _realmApp;
    private User _realmUser;

    void Awake() {
        DontDestroyOnLoad(gameObject);
        Instance = this;
    }

    void OnDisable() {
        if(_realm != null) {
            _realm.Dispose();
        }
    }

    public async Task<string> Login(string email, string password) {}

    public PlayerProfile GetPlayerProfile() {}

    public void IncreaseScore() {}

    public void ResetScore() {}

    public bool IsSparkBlasterEnabled() {}

    public bool IsCrossBlasterEnabled() {}

}
The above code is incomplete, but it gives you an idea of where we are going.
First, take notice of the RealmAppId variable. You’re going to want to use your Realm application so sync can happen based on how you’ve configured everything. This also applies to the authentication rules that are in place for your particular application.
The RealmController class is going to be used as a singleton object between scenes. The goal is to make sure it cannot be destroyed and everything we do is through a static instance of itself.
In the Awake method, we are saying that the game object that the script is attached to should not be destroyed and that we are setting the static variable to itself. In the OnDisable, we are doing cleanup which should really only happen when the game is closed.
Most of the magic will happen in the Login function:
public async Task<string> Login(string email, string password) {
    if(email != "" && password != "") {
        _realmApp = App.Create(new AppConfiguration(RealmAppId) {
            MetadataPersistenceMode = MetadataPersistenceMode.NotEncrypted
        });
        try {
            if(_realmUser == null) {
                _realmUser = await _realmApp.LogInAsync(Credentials.EmailPassword(email, password));
                _realm = await Realm.GetInstanceAsync(new SyncConfiguration(email, _realmUser));
            } else {
                _realm = Realm.GetInstance(new SyncConfiguration(email, _realmUser));
            }
        } catch (ClientResetException clientResetEx) {
            if(_realm != null) {
                _realm.Dispose();
            }
            clientResetEx.InitiateClientReset();
        }
        return _realmUser.Id;
    }
    return "";
}
In the above code, we are defining our Realm application based on the application id. Next we are attempting to log into the application using email and password authentication, something we had previously configured in the web dashboard. If successful, we are getting an instance of our Realm to work with going forward. The data to be synchronized is based on our partition field which in this case is the email address. This means we’re only synchronizing data for this particular email address.
If all goes smooth with the login, the id for the user is returned.
At some point in time, we’re going to need to load the player data. This is where the GetPlayerProfile function comes in:
public PlayerProfile GetPlayerProfile() {
    PlayerProfile _playerProfile = _realm.Find<PlayerProfile>(_realmUser.Id);
    if(_playerProfile == null) {
        _realm.Write(() => {
            _playerProfile = _realm.Add(new PlayerProfile(_realmUser.Id));
        });
    }
    return _playerProfile;
}
What we’re doing is we’re taking the current Realm instance and we’re finding a particular player profile based on the id. If one does not exist, then we create one using the current id. In the end, we’re returning a player profile, whether it be one that we had been using or a fresh one.
We know that we’re going to be working with score data in our game. We need to be able to increase the score, reset the score, and calculate the high score for a player.
Starting with the IncreaseScore, we have the following:
public void IncreaseScore() {
    PlayerProfile _playerProfile = GetPlayerProfile();
    if(_playerProfile != null) {
        _realm.Write(() => {
            _playerProfile.Score++;
        });
    }
}
First we get the player profile and then we take whatever score is associated with it and increase it by one. With Realm we can work with our objects like native C# objects. The exception is that when we want to write, we have to wrap it in a Write block. Reads we don’t have to.
Next let’s look at the ResetScore function:
public void ResetScore() {
    PlayerProfile _playerProfile = GetPlayerProfile();
    if(_playerProfile != null) {
        _realm.Write(() => {
            if(_playerProfile.Score > _playerProfile.HighScore) {
                _playerProfile.HighScore = _playerProfile.Score;
            }
            _playerProfile.Score = 0;
        });
    }
}
In the end we want to zero out the score, but we also want to see if our current score is the highest score before we do. We can do all this within the Write block and it will synchronize to the server.
Finally we have our two functions to tell us if a certain blaster is available to us:
public bool IsSparkBlasterEnabled() {
    PlayerProfile _playerProfile = GetPlayerProfile();
    return _playerProfile != null ? _playerProfile.SparkBlasterEnabled : false;
}
The reason our blasters are data dependent is because we may want to unlock them based on points or through a micro-transaction. In this case, maybe Realm Sync takes care of it.
The IsCrossBlasterEnabled function isn’t much different:
public bool IsCrossBlasterEnabled() {
    PlayerProfile _playerProfile = GetPlayerProfile();
    return _playerProfile != null ? _playerProfile.CrossBlasterEnabled : false;
}
The difference is we are using a different field from our data model.
With the Realm logic in place for the game, we can focus on giving the other game objects life through scripts.
Developing the Game-Play Logic Scripts for the Space Shooter Game Objects
Almost every game object that we’ve created will be receiving a script with logic. To keep the flow appropriate, we’re going to add logic in a natural progression. This means we’re going to start with the LoginScene and each of the game objects that live in it.
For the LoginScene, only two game objects will be receiving scripts:
- LoginController
- RealmController
Since we already have a RealmController.cs script file, go ahead and attach it to the RealmController game object as a component.
Next up, we need to create an Assets/Scripts/LoginController.cs file with the following C# code:
using System.Collections;
using System.Collections.Generic;
using UnityEngine;
using UnityEngine.UI;
using UnityEngine.SceneManagement;

public class LoginController : MonoBehaviour {

    public Button LoginButton;
    public InputField UsernameInput;
    public InputField PasswordInput;

    void Start() {
        UsernameInput.text = "nic.raboy@mongodb.com";
        PasswordInput.text = "password1234";
        LoginButton.onClick.AddListener(Login);
    }

    async void Login() {
        if(await RealmController.Instance.Login(UsernameInput.text, PasswordInput.text) != "") {
            SceneManager.LoadScene("MainScene");
        }
    }

    void Update() {
        if(Input.GetKey("escape")) {
            Application.Quit();
        }
    }

}
There’s not a whole lot going on since the backbone of this script is in the RealmController.cs file.
What we’re doing in the LoginController.cs file is we’re defining the UI components which we’ll link through the Unity IDE. When the script starts, we’re going to default the values of our input fields and we’re going to assign a click event listener to the button.
When the button is clicked, the Login function from the RealmController.cs file is called and we pass the provided email and password. If we get an id back, we know we were successful so we can switch to the next scene.
The Update method isn’t a complete necessity, but if you want to be able to quit the game with the escape key, that is what this particular piece of logic does.
Attach the LoginController.cs script to the LoginController game object as a component and then drag each of the corresponding UI game objects into the script via the game object inspector. Remember, we defined public variables for each of the UI components. We just need to tell Unity what they are by linking them in the inspector.
The LoginScene logic is complete. Can you believe it? This is because the Realm SDK for Unity is doing all the heavy lifting for us.
The MainScene has a lot more going on, but we’ll break down what’s happening.
Let’s start with something you don’t actually see but that controls all of our prefab instances. I’m talking about the object pooling script.
In short, creating and destroying game objects on-demand is resource intensive. Instead, we should create a fixed amount of game objects when the game loads and hide them or show them based on when they are needed. This is what an object pool does.
Create an Assets/Scripts/ObjectPool.cs file with the following C# code:
using System.Collections;
using System.Collections.Generic;
using UnityEngine;

public class ObjectPool : MonoBehaviour
{

    public static ObjectPool SharedInstance;

    private List<GameObject> pooledEnemies;
    private List<GameObject> pooledBlasters;
    private List<GameObject> pooledCrossBlasts;
    private List<GameObject> pooledSparkBlasts;
    public GameObject enemyToPool;
    public GameObject blasterToPool;
    public GameObject crossBlastToPool;
    public GameObject sparkBlastToPool;
    public int amountOfEnemiesToPool;
    public int amountOfBlastersToPool;
    public int amountOfCrossBlastsToPool;
    public int amountOfSparkBlastsToPool;

    void Awake() {
        SharedInstance = this;
    }

    void Start() {
        pooledEnemies = new List<GameObject>();
        pooledBlasters = new List<GameObject>();
        pooledCrossBlasts = new List<GameObject>();
        pooledSparkBlasts = new List<GameObject>();
        GameObject tmpEnemy;
        GameObject tmpBlaster;
        GameObject tmpCrossBlast;
        GameObject tmpSparkBlast;
        for(int i = 0; i < amountOfEnemiesToPool; i++) {
            tmpEnemy = Instantiate(enemyToPool);
            tmpEnemy.SetActive(false);
            pooledEnemies.Add(tmpEnemy);
        }
        for(int i = 0; i < amountOfBlastersToPool; i++) {
            tmpBlaster = Instantiate(blasterToPool);
            tmpBlaster.SetActive(false);
            pooledBlasters.Add(tmpBlaster);
        }
        for(int i = 0; i < amountOfCrossBlastsToPool; i++) {
            tmpCrossBlast = Instantiate(crossBlastToPool);
            tmpCrossBlast.SetActive(false);
            pooledCrossBlasts.Add(tmpCrossBlast);
        }
        for(int i = 0; i < amountOfSparkBlastsToPool; i++) {
            tmpSparkBlast = Instantiate(sparkBlastToPool);
            tmpSparkBlast.SetActive(false);
            pooledSparkBlasts.Add(tmpSparkBlast);
        }
    }

    public GameObject GetPooledEnemy() {
        for(int i = 0; i < amountOfEnemiesToPool; i++) {
            if(pooledEnemies[i].activeInHierarchy == false) {
                return pooledEnemies[i];
            }
        }
        return null;
    }

    public GameObject GetPooledBlaster() {
        for(int i = 0; i < amountOfBlastersToPool; i++) {
            if(pooledBlasters[i].activeInHierarchy == false) {
                return pooledBlasters[i];
            }
        }
        return null;
    }

    public GameObject GetPooledCrossBlast() {
        for(int i = 0; i < amountOfCrossBlastsToPool; i++) {
            if(pooledCrossBlasts[i].activeInHierarchy == false) {
                return pooledCrossBlasts[i];
            }
        }
        return null;
    }

    public GameObject GetPooledSparkBlast() {
        for(int i = 0; i < amountOfSparkBlastsToPool; i++) {
            if(pooledSparkBlasts[i].activeInHierarchy == false) {
                return pooledSparkBlasts[i];
            }
        }
        return null;
    }

}
The above object pooling logic is not code optimized because I wanted to keep it readable. If you want to see an optimized version, check out a previous tutorial I wrote on the subject.
So let’s break down what we’re doing in this object pool.
We have four different game objects to pool:
- Enemies
- Spark Blasters
- Cross Blasters
- Regular Blasters
These need to be pooled because there could be more than one of the same object at any given time. We’re using public variables for each of the game objects and quantities so that we can properly link them to actual game objects in the Unity IDE.
Like with the RealmController.cs script, this script will also act as a singleton to be used as needed.
In the Start method, we are instantiating a game object, as per the quantities defined through the Unity IDE, and adding them to a list. Ideally the linked game object should be one of the prefabs that we previously defined. The list of instantiated game objects represent our pools. We have four object pools to pull from.
Pulling from the pool is as simple as creating a function for each pool and seeing what’s available. Take the GetPooledEnemy function for example:
public GameObject GetPooledEnemy() {
    for(int i = 0; i < amountOfEnemiesToPool; i++) {
        if(pooledEnemies[i].activeInHierarchy == false) {
            return pooledEnemies[i];
        }
    }
    return null;
}
In the above code, we loop through each object in our pool, in this case enemies. If an object is inactive it means we can pull it and use it. If our pool is depleted, then we either defined too small of a pool or we need to wait until something is available.
I like to pool about 50 of each game object even if I only ever plan to use 10. Doesn’t hurt to have excess as it’s still less resource-heavy than creating and destroying game objects as needed.
The ObjectPool.cs file should be attached as a component to the GameController game object. After attaching, make sure you assign your prefabs and the pooled quantities using the game object inspector within the Unity IDE.
The ObjectPool.cs script isn’t the only script we’re going to attach to the GameController game object. We need to create a script that will control the flow of our game. Create an Assets/Scripts/GameController.cs file with the following C# code:
using System.Collections;
using System.Collections.Generic;
using UnityEngine;
using UnityEngine.UI;

public class GameController : MonoBehaviour {

    public float timeUntilEnemy = 1.0f;
    public float minTimeUntilEnemy = 0.25f;
    public float maxTimeUntilEnemy = 2.0f;

    public GameObject SparkBlasterGraphic;
    public GameObject CrossBlasterGraphic;

    public Text highScoreText;
    public Text scoreText;

    private PlayerProfile _playerProfile;

    void OnEnable() {
        _playerProfile = RealmController.Instance.GetPlayerProfile();
        highScoreText.text = "HIGH SCORE: " + _playerProfile.HighScore.ToString();
        scoreText.text = "SCORE: " + _playerProfile.Score.ToString();
    }

    void Update() {
        highScoreText.text = "HIGH SCORE: " + _playerProfile.HighScore.ToString();
        scoreText.text = "SCORE: " + _playerProfile.Score.ToString();
        timeUntilEnemy -= Time.deltaTime;
        if(timeUntilEnemy <= 0) {
            GameObject enemy = ObjectPool.SharedInstance.GetPooledEnemy();
            if(enemy != null) {
                enemy.SetActive(true);
            }
            timeUntilEnemy = Random.Range(minTimeUntilEnemy, maxTimeUntilEnemy);
        }
        if(_playerProfile != null) {
            SparkBlasterGraphic.SetActive(_playerProfile.SparkBlasterEnabled);
            CrossBlasterGraphic.SetActive(_playerProfile.CrossBlasterEnabled);
        }
        if(Input.GetKey("escape")) {
            Application.Quit();
        }
    }

}
There’s a diverse set of things happening in the above script, so let’s break them down.
You’ll notice the following public variables:
public float timeUntilEnemy = 1.0f;
public float minTimeUntilEnemy = 0.25f;
public float maxTimeUntilEnemy = 2.0f;
We’re going to use these variables to define when a new enemy should be activated.
The timeUntilEnemy represents how much actual time from the current time until a new enemy should be pulled from the object pool. The minTimeUntilEnemy and maxTimeUntilEnemy will be used for randomizing what the timeUntilEnemy value should become after an enemy is pooled. It’s boring to have all enemies appear after a fixed amount of time, so the minimum and maximum values keep things interesting.
public GameObject SparkBlasterGraphic;
public GameObject CrossBlasterGraphic;

public Text highScoreText;
public Text scoreText;
Remember those UI components and sprites to represent enabled blasters we had created earlier in the Unity IDE? When we attach this script to the GameController game object, you’re going to want to assign the other components in the game object inspector.
This brings us to the OnEnable method:
void OnEnable() {
    _playerProfile = RealmController.Instance.GetPlayerProfile();
    highScoreText.text = "HIGH SCORE: " + _playerProfile.HighScore.ToString();
    scoreText.text = "SCORE: " + _playerProfile.Score.ToString();
}
The OnEnable method is where we’re going to get our current player profile and then update the score values visually based on the data stored in the player profile. The Update method will continuously update those score values for as long as the scene is showing.
void Update() {
    highScoreText.text = "HIGH SCORE: " + _playerProfile.HighScore.ToString();
    scoreText.text = "SCORE: " + _playerProfile.Score.ToString();
    timeUntilEnemy -= Time.deltaTime;
    if(timeUntilEnemy <= 0) {
        GameObject enemy = ObjectPool.SharedInstance.GetPooledEnemy();
        if(enemy != null) {
            enemy.SetActive(true);
        }
        timeUntilEnemy = Random.Range(minTimeUntilEnemy, maxTimeUntilEnemy);
    }
    if(_playerProfile != null) {
        SparkBlasterGraphic.SetActive(_playerProfile.SparkBlasterEnabled);
        CrossBlasterGraphic.SetActive(_playerProfile.CrossBlasterEnabled);
    }
    if(Input.GetKey("escape")) {
        Application.Quit();
    }
}
In the Update method, every time it’s called, we subtract the delta time from our timeUntilEnemy variable. When the value is zero, we attempt to get a new enemy from the object pool and then reset the timer. Outside of the object pooling, we’re also checking to see if the other blasters have become enabled. If they have been, we can update the game object status for our sprites. This will allow us to easily show and hide these sprites.
If you haven’t already, attach the GameController.cs script to the GameController game object. Remember to update any values for the script within the game object inspector.
If we were to run the game, every enemy would have the same position and they would not be moving. We need to assign logic to the enemies.
Create an Assets/Scripts/Enemy.cs file with the following C# code:
using System.Collections;
using System.Collections.Generic;
using UnityEngine;

public class Enemy : MonoBehaviour {

    public float movementSpeed = 5.0f;

    void OnEnable() {
        float randomPositionY = Random.Range(-4.0f, 4.0f);
        transform.position = new Vector3(10.0f, randomPositionY, 0);
    }

    void Update() {
        transform.position += Vector3.left * movementSpeed * Time.deltaTime;
        if(transform.position.x < -10.0f) {
            gameObject.SetActive(false);
        }
    }

    void OnTriggerEnter2D(Collider2D collider) {
        if(collider.tag == "Weapon") {
            gameObject.SetActive(false);
            RealmController.Instance.IncreaseScore();
        }
    }

}
When the enemy is pulled from the object pool, the game object becomes enabled. So the OnEnable method picks a random y-axis position for the game object. For every frame, the Update method will move the game object along the x-axis. If the game object goes off the screen, we can safely add it back into the object pool.
The OnTriggerEnter2D method is for our collision detection. We’re not doing physics collisions so this method just tells us if the objects have touched. If the current game object, in this case the enemy, has collided with a game object tagged as a weapon, then add the enemy back into the queue and increase the score.
Attach the Enemy.cs script to your enemy prefab.
By now, your game probably looks something like this, minus the animations:
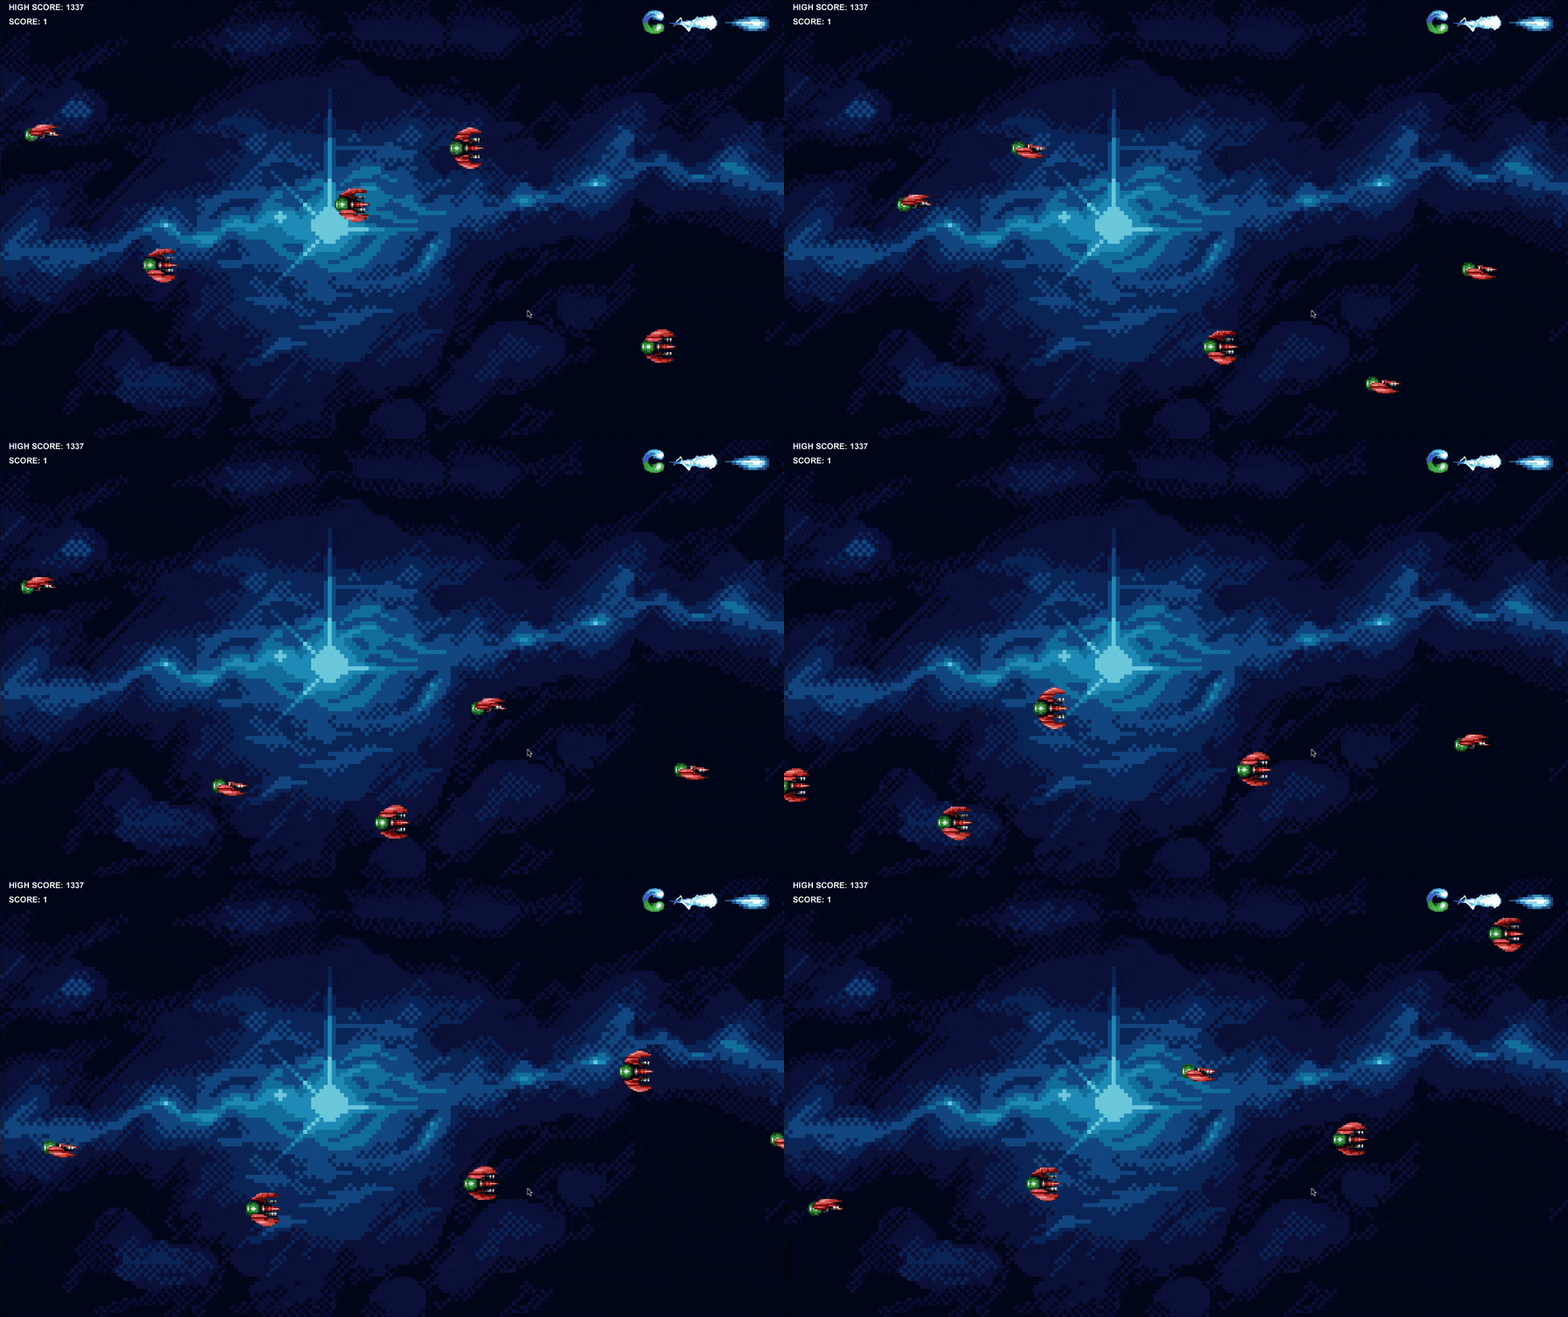
We won’t be worrying about animations in this tutorial. Consider that part of your extracurricular challenge after completing this tutorial.
So we have a functioning enemy pool. Let’s look at the blaster logic since it is similar.
Create an Assets/Scripts/Blaster.cs file with the following C# logic:
using System.Collections;
using System.Collections.Generic;
using UnityEngine;

public class Blaster : MonoBehaviour {

    public float movementSpeed = 5.0f;
    public float decayRate = 2.0f;

    private float timeToDecay;

    void OnEnable() {
        timeToDecay = decayRate;
    }

    void Update() {
        timeToDecay -= Time.deltaTime;
        transform.position += Vector3.right * movementSpeed * Time.deltaTime;
        if(transform.position.x > 10.0f || timeToDecay <= 0) {
            gameObject.SetActive(false);
        }
    }

    void OnTriggerEnter2D(Collider2D collider) {
        if(collider.tag == "Enemy") {
            gameObject.SetActive(false);
        }
    }

}
Look mildly familiar to the enemy? It is similar.
We need to first define how fast each blaster should move and how quickly the blaster should disappear if it hasn’t hit anything.
In the Update method will subtract the current time from our blaster decay time. The blaster will continue to move along the x-axis until it has either gone off screen or it has decayed. In this scenario, the blaster is added back into the object pool. If the blaster collides with a game object tagged as an enemy, the blaster is also added back into the pool. Remember, the blaster will likely be tagged as a weapon so the Enemy.cs script will take care of adding the enemy back into the object pool.
Attach the Blaster.cs script to your blaster prefab and apply any value settings as necessary with the Unity IDE in the inspector.
To make the game interesting, we’re going to add some very slight differences to the other blasters.
Create an Assets/Scripts/CrossBlast.cs script with the following C# code:
using System.Collections;
using System.Collections.Generic;
using UnityEngine;

public class CrossBlast : MonoBehaviour {

    public float movementSpeed = 5.0f;

    void Update() {
        transform.position += Vector3.right * movementSpeed * Time.deltaTime;
        if(transform.position.x > 10.0f) {
            gameObject.SetActive(false);
        }
    }

    void OnTriggerEnter2D(Collider2D collider) { }

}
At a high level, this blaster behaves the same. However, if it collides with an enemy, it keeps going. It only goes back into the object pool when it goes off the screen. So there is no decay and it isn’t a one enemy per blast weapon.
Let’s look at an Assets/Scripts/SparkBlast.cs script:
using System.Collections;
using System.Collections.Generic;
using UnityEngine;

public class SparkBlast : MonoBehaviour {

    public float movementSpeed = 5.0f;

    void Update() {
        transform.position += Vector3.right * movementSpeed * Time.deltaTime;
        if(transform.position.x > 10.0f) {
            gameObject.SetActive(false);
        }
    }

    void OnTriggerEnter2D(Collider2D collider) {
        if(collider.tag == "Enemy") {
            gameObject.SetActive(false);
        }
    }

}
The minor difference in the above script is that it has no decay, but it can only ever destroy one enemy.
Make sure you attach these scripts to the appropriate blaster prefabs.
We’re almost done! We have one more script and that’s for the actual player!
Create an Assets/Scripts/Player.cs file and add the following code:
using System.Collections;
using System.Collections.Generic;
using UnityEngine;

public class Player : MonoBehaviour
{

    public float movementSpeed = 5.0f;
    public float respawnSpeed = 8.0f;
    public float weaponFireRate = 0.5f;

    private float nextBlasterTime = 0.0f;
    private bool isRespawn = true;

    void Update() {
        if(isRespawn == true) {
            transform.position = Vector2.MoveTowards(transform.position, new Vector2(-6.0f, -0.25f), respawnSpeed * Time.deltaTime);
            if(transform.position == new Vector3(-6.0f, -0.25f, 0.0f)) {
                isRespawn = false;
            }
        } else {
            if(Input.GetKey(KeyCode.UpArrow) && transform.position.y < 4.0f) {
                transform.position += Vector3.up * movementSpeed * Time.deltaTime;
            } else if(Input.GetKey(KeyCode.DownArrow) && transform.position.y > -4.0f) {
                transform.position += Vector3.down * movementSpeed * Time.deltaTime;
            }
            if(Input.GetKey(KeyCode.Space) && Time.time > nextBlasterTime) {
                nextBlasterTime = Time.time + weaponFireRate;
                GameObject blaster = ObjectPool.SharedInstance.GetPooledBlaster();
                if(blaster != null) {
                    blaster.SetActive(true);
                    blaster.transform.position = new Vector3(transform.position.x + 1, transform.position.y);
                }
            }
            if(RealmController.Instance.IsCrossBlasterEnabled()) {
                if(Input.GetKey(KeyCode.B) && Time.time > nextBlasterTime) {
                    nextBlasterTime = Time.time + weaponFireRate;
                    GameObject crossBlast = ObjectPool.SharedInstance.GetPooledCrossBlast();
                    if(crossBlast != null) {
                        crossBlast.SetActive(true);
                        crossBlast.transform.position = new Vector3(transform.position.x + 1, transform.position.y);
                    }
                }
            }
            if(RealmController.Instance.IsSparkBlasterEnabled()) {
                if(Input.GetKey(KeyCode.V) && Time.time > nextBlasterTime) {
                    nextBlasterTime = Time.time + weaponFireRate;
                    GameObject sparkBlast = ObjectPool.SharedInstance.GetPooledSparkBlast();
                    if(sparkBlast != null) {
                        sparkBlast.SetActive(true);
                        sparkBlast.transform.position = new Vector3(transform.position.x + 1, transform.position.y);
                    }
                }
            }
        }
    }

    void OnTriggerEnter2D(Collider2D collider) {
        if(collider.tag == "Enemy" && isRespawn == false) {
            RealmController.Instance.ResetScore();
            transform.position = new Vector3(-10.0f, -0.25f, 0.0f);
            isRespawn = true;
        }
    }

}
Looking at the above script, we have a few variables to keep track of:
public float movementSpeed = 5.0f;
public float respawnSpeed = 8.0f;
public float weaponFireRate = 0.5f;

private float nextBlasterTime = 0.0f;
private bool isRespawn = true;
We want to define how fast the player can move, how long it takes for the respawn animation to happen, and how fast you’re allowed to fire blasters.
In the Update method, we first check to see if we are currently respawning:
transform.position = Vector2.MoveTowards(transform.position, new Vector2(-6.0f, -0.25f), respawnSpeed * Time.deltaTime);
if(transform.position == new Vector3(-6.0f, -0.25f, 0.0f)) {
    isRespawn = false;
}
If we are respawning, then we need to smoothly move the player game object towards a particular coordinate position. When the game object has reached that new position, then we can disable the respawn indicator that prevents us from controlling the player.
If we’re not respawning, we can check to see if the movement keys were pressed:
if(Input.GetKey(KeyCode.UpArrow) && transform.position.y < 4.0f) {
    transform.position += Vector3.up * movementSpeed * Time.deltaTime;
} else if(Input.GetKey(KeyCode.DownArrow) && transform.position.y > -4.0f) {
    transform.position += Vector3.down * movementSpeed * Time.deltaTime;
}
When pressing a key, as long as we haven’t moved outside our y-axis boundary, we can adjust the position of the player. Since this is in the Update method, the movement should be smooth for as long as you are holding a key.
Using a blaster isn’t too different:
if(Input.GetKey(KeyCode.Space) && Time.time > nextBlasterTime) {
    nextBlasterTime = Time.time + weaponFireRate;
    GameObject blaster = ObjectPool.SharedInstance.GetPooledBlaster();
    if(blaster != null) {
        blaster.SetActive(true);
        blaster.transform.position = new Vector3(transform.position.x + 1, transform.position.y);
    }
}
If the particular blaster key is pressed and our rate limit isn’t exceeded, we can update our nextBlasterTime based on the rate limit, pull a blaster from the object pool, and let the blaster do its magic based on the Blaster.cs script. All we’re doing in the Player.cs script is checking to see if we’re allowed to fire and if we are pull from the pool.
The data dependent spark and cross blasters follow the same rules, the exception being that we first check to see if they are enabled in our player profile.
Finally, we have our collisions:
void OnTriggerEnter2D(Collider2D collider) {
    if(collider.tag == "Enemy" && isRespawn == false) {
        RealmController.Instance.ResetScore();
        transform.position = new Vector3(-10.0f, -0.25f, 0.0f);
        isRespawn = true;
    }
}
If our player collides with a game object tagged as an enemy and we’re not currently respawning, then we can reset the score and trigger the respawn.
Make sure you attach this Player.cs script to your Player game object.
If everything worked out, the game should be functional at this point. If something isn’t working correctly, double check the following:
- Make sure each of your game objects is properly tagged.
- Make sure the scripts are attached to the proper game object or prefab.
- Make sure the values on the scripts have been defined through the Unity IDE inspector.
Play around with the game and setting values within MongoDB Atlas.
Conclusion
You just saw how to create a space shooter type game with Unity that syncs with MongoDB Atlas by using the Realm SDK for Unity and Realm Sync. Realm only played a small part in this game because that is the beauty of Realm. You can get data persistence and sync with only a few lines of code.
Want to give this project a try? I’ve uploaded all of the source code to GitHub. You just need to clone the project, replace my Realm ID with yours, and build the project. Of course you’ll still need to have properly configured Atlas and Realm in the cloud.
If you’re looking for a slightly slower introduction to Realm with Unity, check out a previous tutorial that I wrote on the subject.
If you’d like to connect with us further, don’t forget to visit the community forums.
This content first appeared on MongoDB.

