Including Attractive Charts In Your Angular Web Application
It’s probably obvious, but most modern applications crave data and in many of those scenarios, being able to visualize the data is a necessity. This is where charting and graphs become valuable within frontend applications. Having attractive charts in your application can make a world of difference and with a convenient library like Chart.js, it isn’t complicated.
If you’ve been keeping up, you’ll remember I wrote a tutorial titled, Use Chart.js to Display Attractive Charts in a Vue.js Web Application which focused on Vue.js. This time around we’re going to see how to include charts in an Angular web application.
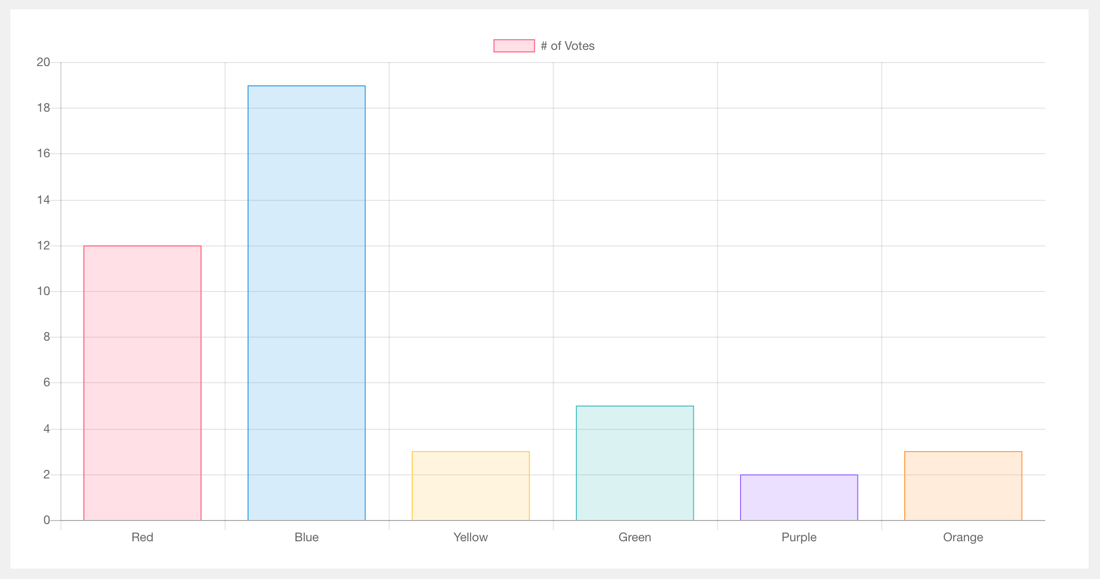
Before we dive into the code, let’s take a step back and figure out what we plan to build. Take a look at the simple image below that demonstrates Chart.js:

If you think it looks familiar, it is because it was taken from the Chart.js documentation. It also came from my previous tutorial with the Vue.js JavaScript framework. On that note, much of our code is going to come from the official Chart.js documentation, but with some Angular flair.
Creating an Angular Project with the Chart.js Dependency
We’re going to assume that you have the Angular CLI installed and ready to go. With the Angular CLI we can create a simple project and work our way up. From the CLI, execute the following:
ng new chart-project
The above command will create a new Angular with TypeScript project. The next step is to install the Chart.js dependency to be used in our project. After navigating into our project, execute the following from the command line:
npm install chart.js --save
At this point in time, we can crack open the code and start developing some magic!
Filling a Canvas UI Component with Data
When it comes to our project we are going to be working with three different files. We’re going to be adding our markup to the HTML file, our logic to the TypeScript file, and our styles to the CSS file.
Open the project’s src/app/app.component.html file so we can start with the HTML markup.
<div id="content">
    <canvas #chart></canvas>
</div>
As per the Chart.js documentation we’ll be using the <canvas> tag. However, take note of the #chart attribute that we’re using. The #chart attribute is how we can have Angular control the DOM without data binding.
For sanities sake, let’s add our brief CSS. Open the project’s src/app/app.component.css file and include the following:
#content {
    margin: auto;
    width: 1024px;
    background-color: #FFFFFF;
    padding: 20px;
}
Now we can focus on what matters. We’re going to focus on the application driving logic found in the corresponding TypeScript file.
Open the project’s src/app/app.component.ts file and include the following:
import { Component, OnInit, ViewChild, ElementRef } from '@angular/core';
import Chart from 'chart.js';

@Component({
    selector: 'app-root',
    templateUrl: './app.component.html',
    styleUrls: ['./app.component.css']
})
export class AppComponent implements OnInit {

    @ViewChild("chart")
    public refChart: ElementRef;

    public chartData: any;

    public constructor() { }

    public ngOnInit() { }

    public ngAfterViewInit() { }

}
I’ve purposefully chosen to not fill the methods as of now. We want to understand the plan and the variables that currently exist. Remember that #chart attribute from the <canvas> tag? The same attribute is used in the @ViewChild, but the variable itself doesn’t matter in terms of name. The chartData variable will potentially hold our remote application data, but for this example we’re going to hard code it.
The constructor method is where we’re going to initialize our variable. Had we been using a remote service, we’d load our data in the ngOnInit and the ngAfterViewInit is where we’ll alter the DOM element.
The constructor method should look like the following:
public constructor() {
    this.chartData = {};
}
If we were gathering data from the internet, it might look like the following in the ngOnInit method:
public ngOnInit() {
    this.chartData = {
        labels: ["Red", "Blue", "Yellow", "Green", "Purple", "Orange"],
        datasets: [{
            label: '# of Votes',
            data: [12, 19, 3, 5, 2, 3],
            backgroundColor: [
                'rgba(255, 99, 132, 0.2)',
                'rgba(54, 162, 235, 0.2)',
                'rgba(255, 206, 86, 0.2)',
                'rgba(75, 192, 192, 0.2)',
                'rgba(153, 102, 255, 0.2)',
                'rgba(255, 159, 64, 0.2)'
            ],
            borderColor: [
                'rgba(255,99,132,1)',
                'rgba(54, 162, 235, 1)',
                'rgba(255, 206, 86, 1)',
                'rgba(75, 192, 192, 1)',
                'rgba(153, 102, 255, 1)',
                'rgba(255, 159, 64, 1)'
            ],
            borderWidth: 1
        }]
    };
}
I don’t think there are any circumstances where the data would be immediately compatible with Chart.js like it is above. Anticipate having to massage your remote data to work with Chart.js. Remember, the data above came from the documentation.
The final step is to connect the data to the DOM element. Take a look at the ngAfterViewInit method:
public ngAfterViewInit() {
    let chart = this.refChart.nativeElement;
    let ctx = chart.getContext("2d");
    let myChart = new Chart(ctx, {
        type: 'bar',
        data: this.chartData,
        options: {
            scales: {
                yAxes: [{
                    ticks: {
                        beginAtZero: true
                    }
                }]
            }
        }
    });
}
In the above method, the magic comes from the this.refChart.nativeElement property. We can obtain the reference and create the chart using the data as well as any configuration options.
Conclusion
You just saw how to include Chart.js in an Angular application. Having charting in your application is useful if you want to visualize your data. There are, of course, other charting libraries and plenty of packages that make it easier to work with for Angular. The example seen here was just about as vanilla as you can get.
If you’re still using AngularJS, I wrote a tutorial a few years back on using Chart.js in an Ionic Framework mobile application. The tutorial titled, Using Charts in Your Ionic Framework Mobile App should still be valid, but it is for AngularJS, not Angular.

