Extend Legacy Java Android Applications With NativeScript And Angular
As some of you might know, before I started developing cross platform mobile applications using Ionic Framework and NativeScript, I was developing Android applications using nothing more than the Android SDK and Java. I still have one of my first applications, SQLTool, for sale in Google Play, and it was written with Java and Android. When building mobile applications, frameworks like NativeScript are incredibly attractive to web developers because they can use a common set of web design and development skills. However, NativeScript can be equally attractive to development teams writing Android applications with Java.
With NativeScript you can actually build a “polyglot” type application where parts are Java and parts are NativeScript with Angular. To be clear, I’m not talking about rewriting your Java application into modules wrapped in JavaScript like plugins. I’m saying that you can take your 100% Android with Java application and add Activities or Fragments built with NativeScript.
So why is this useful?
Imagine being on a small Android development team with more things to be done than there is time in the day. These Android developers would rather die than use a cross platform framework, but you have plenty of web developers floating around your company. In this scenario, the two worlds can collide and maybe the web developers can create lower (or higher) priority components for the Android application without having to convert the whole application to Android with Java or to NativeScript with Angular.
We’re going to take a look at building, what I’m going to call, a polyglot Android application. This will be an Android with Java application that receives NativeScript components to add features.
If you don’t have any legacy Android applications floating around, that is fine. It is also fine if you don’t know Android with Java or NativeScript with Angular because it is the concepts that we’re after instead. Our project goal is to create a currency exchange tracker with Android and Java that shows the conversion rates that have been gathered from a free and public API.
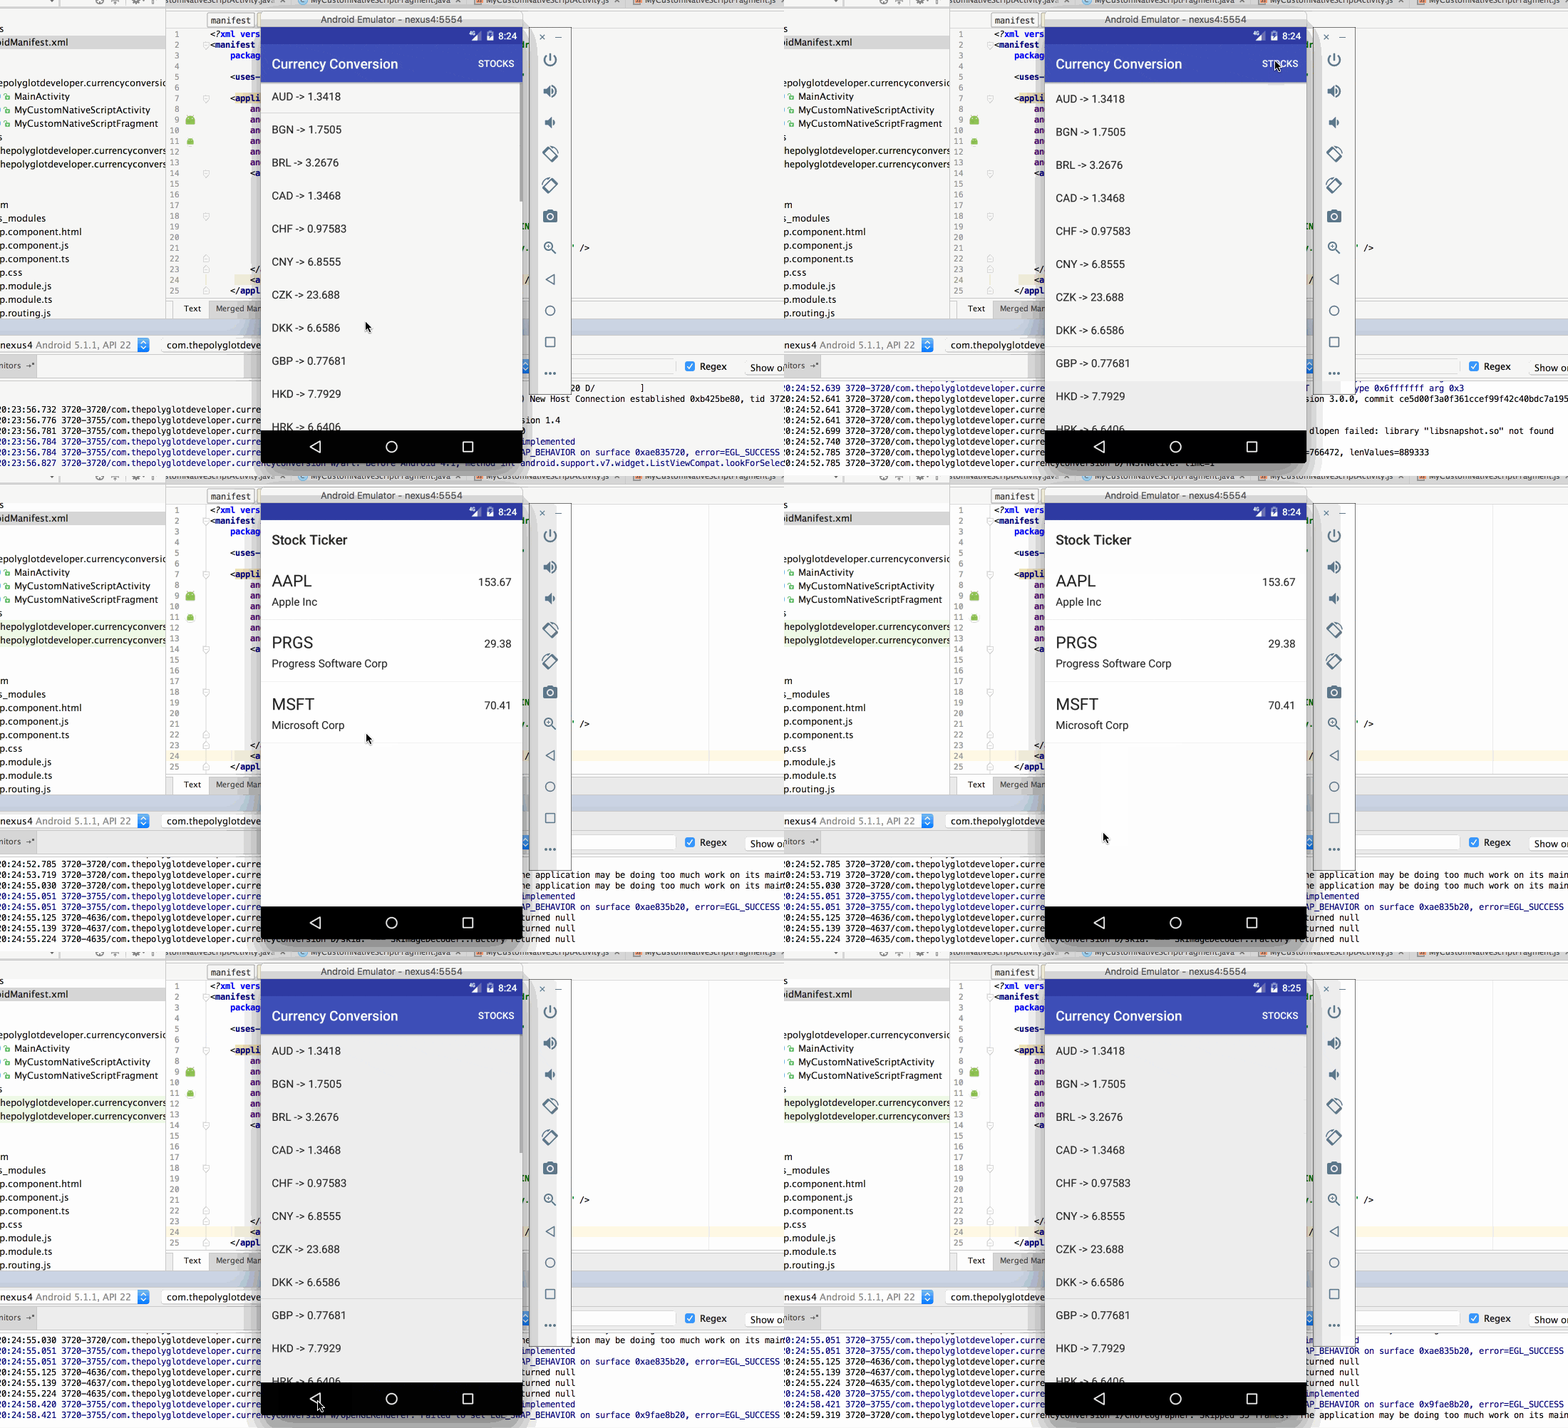
Then we’re going to decide that we also want to show stock ticker information for various publicly traded companies. This part of the application will have been created with NativeScript and Angular. In fact, I actually wrote about this stock ticker application in a previous tutorial titled, Working with RESTful Data in Angular and NativeScript.
The Requirements
There are a few requirements that must be met in order to follow along with the content in this guide.
- Android Studio 2.3+
- NativeScript 3.0+
Android Studio is required to build the Java side of our application. It also gives us the Android SDK, a requirement for building NativeScript applications.
Creating a Currency Conversion Application with Android and Java
For simplicity we’re going to create a fresh Android project rather than trying to mess around with old code that can be completely insane. In Android Studio, let’s create a fresh, single Activity, project.
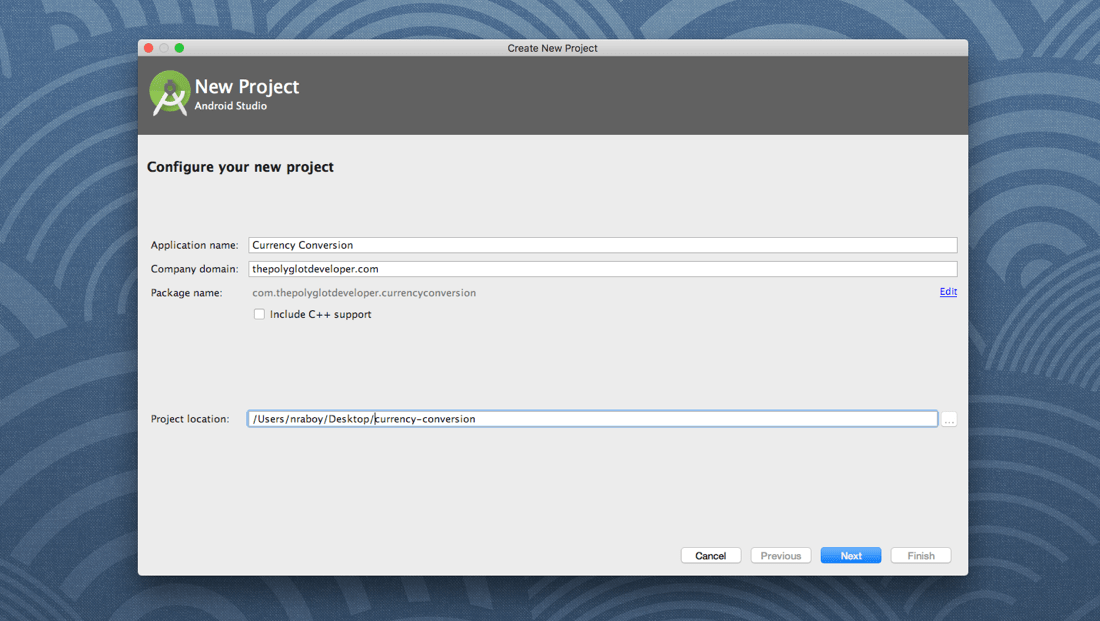
It doesn’t really matter what you name it, but it does help avoid confusion if you name it something in regards to currency. Otherwise you might get confused when we jump between NativeScript and Android Studio. The next step is to define what versions of Android you wish to support within your application.
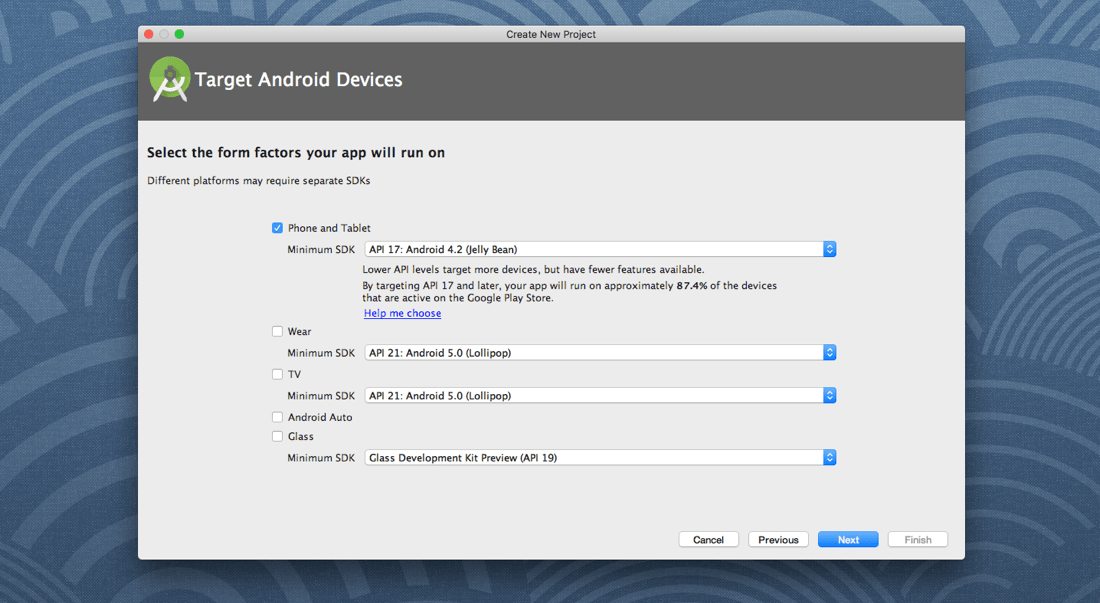
There is a requirement at this step. NativeScript does have a requirement on Android API 17 or higher because of the various libraries that it makes use of. Down the road, this requirement may become more flexible or more strict. The next step is to define some boilerplate Activities or Fragments.
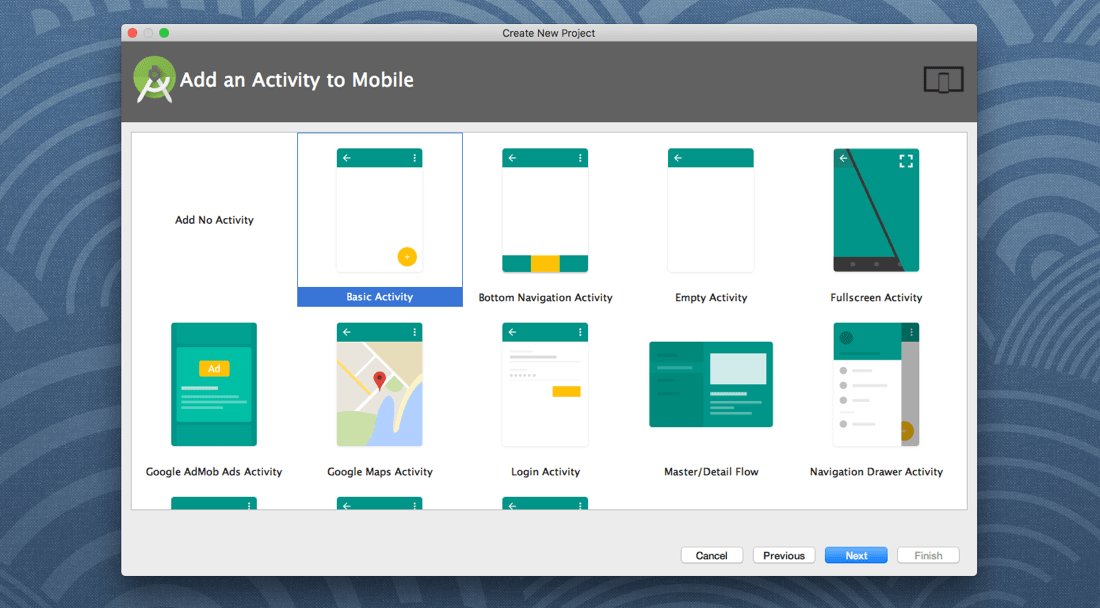
Since this application is fresh and simple, we’re going to choose to use a Basic Activity, but feel free to use something more complex. Finally, we’ll need to provide information about the Android Activity that we’re creating.
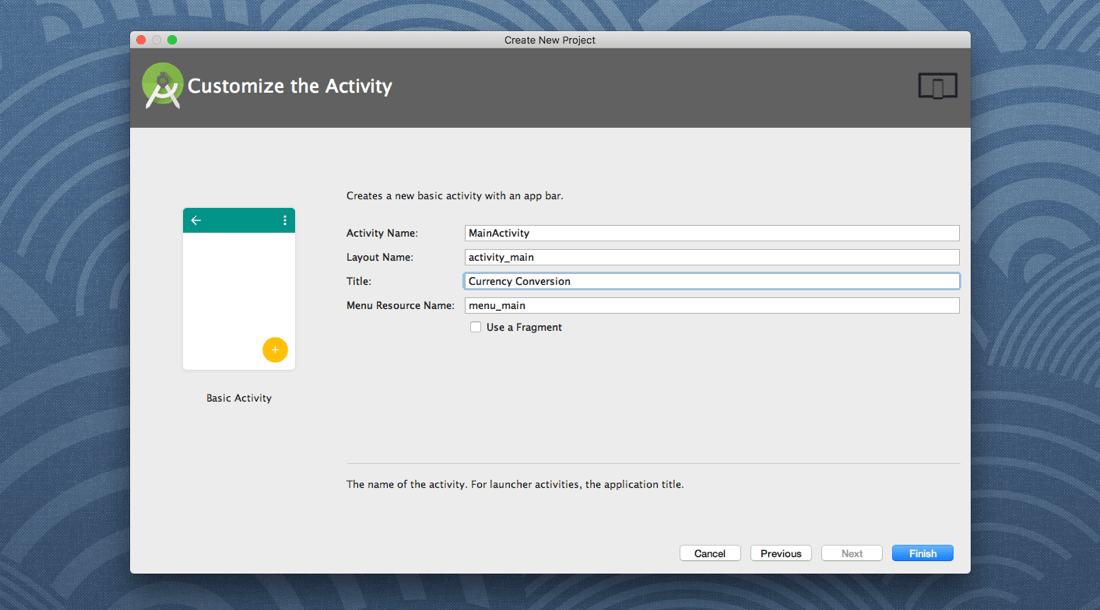
Again, all this is very basic setup and not necessarily relevant to the merging of our technologies. It is just a starting point to make life a little easier.
Going forward, you could do a lot of the UI related stuff with the WYSIWYG editor, but I’ll be providing the raw XML markup instead. It will easily translate in Android Studio to something that can be understood. Open the project’s app/res/layout/content_main.xml and include the following XML markup:
<?xml version="1.0" encoding="utf-8"?>
<LinearLayout xmlns:android="http://schemas.android.com/apk/res/android"
    xmlns:app="http://schemas.android.com/apk/res-auto"
    xmlns:tools="http://schemas.android.com/tools"
    android:layout_width="match_parent"
    android:layout_height="match_parent"
    app:layout_behavior="@string/appbar_scrolling_view_behavior"
    tools:context="com.thepolyglotdeveloper.currencyconversion.MainActivity"
    tools:showIn="@layout/activity_main">

        <ListView
            android:id="@+id/currencyList"
            android:layout_width="match_parent"
            android:layout_height="match_parent"
            tools:layout_editor_absoluteX="8dp"
            tools:layout_editor_absoluteY="8dp" />

</LinearLayout>
The above XML will set us up for listing any currency information returned from the API we plan on using. Next, open the project’s app/res/layout/activity_main.xml and include the following XML markup:
<?xml version="1.0" encoding="utf-8"?>
<android.support.design.widget.CoordinatorLayout xmlns:android="http://schemas.android.com/apk/res/android"
    xmlns:app="http://schemas.android.com/apk/res-auto"
    xmlns:tools="http://schemas.android.com/tools"
    android:layout_width="match_parent"
    android:layout_height="match_parent"
    tools:context="com.thepolyglotdeveloper.currencyconversion.MainActivity">

    <android.support.design.widget.AppBarLayout
        android:layout_width="match_parent"
        android:layout_height="wrap_content"
        android:theme="@style/AppTheme.AppBarOverlay">

        <android.support.v7.widget.Toolbar
            android:id="@+id/toolbar"
            android:layout_width="match_parent"
            android:layout_height="?attr/actionBarSize"
            android:background="?attr/colorPrimary"
            app:popupTheme="@style/AppTheme.PopupOverlay" />

    </android.support.design.widget.AppBarLayout>

    <include layout="@layout/content_main" />

</android.support.design.widget.CoordinatorLayout>
The above XML is pretty much what we had initially, however, we’ve gone ahead and removed the floating action button (FAB) as it won’t be used in this example. While not part of the core content, the menu for this application should also be updated. Open the project’s app/res/menu/menu_main.xml and include the following:
<menu xmlns:android="http://schemas.android.com/apk/res/android"
    xmlns:app="http://schemas.android.com/apk/res-auto"
    xmlns:tools="http://schemas.android.com/tools"
    tools:context="com.thepolyglotdeveloper.currencyconversion.MainActivity">
    <item
        android:id="@+id/action_stocks"
        android:orderInCategory="100"
        android:title="@string/action_stocks"
        app:showAsAction="ifRoom" />
</menu>
To make our HTTP requests that will populate the Android ListView component, we’re going to be using a library called Volley. If you remember correctly, I wrote about using this library in a previous tutorial titled, Using Volley to Make Android HTTP Requests. To use this library, we need to include it in our Gradle file. Open the project’s Gradle Scripts/build.gradle file for the app module and include the following line:
dependencies {
    ...
    compile 'com.android.volley:volley:1.0.0'
    ...
}
With that line included, sync the project dependencies and get ready to get into some Java. Open the project’s app/java/com/thepolyglotdeveloper/currencyconversion/MainActivity.java and include the following Java code which we’ll break down in a moment:
package com.thepolyglotdeveloper.currencyconversion;

import android.os.Bundle;
import android.support.v7.app.AppCompatActivity;
import android.support.v7.widget.Toolbar;
import android.util.Log;
import android.view.Menu;
import android.view.MenuItem;
import android.widget.ArrayAdapter;
import android.widget.ListView;
import com.android.volley.Request;
import com.android.volley.RequestQueue;
import com.android.volley.Response;
import com.android.volley.VolleyError;
import com.android.volley.toolbox.JsonObjectRequest;
import com.android.volley.toolbox.Volley;
import org.json.JSONException;
import org.json.JSONObject;
import java.util.ArrayList;
import java.util.Iterator;

public class MainActivity extends AppCompatActivity {

    public ArrayList<String> currencies = new ArrayList<String>();

    @Override
    protected void onCreate(Bundle savedInstanceState) {
        super.onCreate(savedInstanceState);
        setContentView(R.layout.activity_main);
        Toolbar toolbar = (Toolbar) findViewById(R.id.toolbar);
        setSupportActionBar(toolbar);

        final ListView listview = (ListView) findViewById(R.id.currencyList);
        final ArrayAdapter adapter = new ArrayAdapter(this,
                android.R.layout.simple_list_item_1, currencies);
        listview.setAdapter(adapter);
    }

    @Override
    protected void onStart() {
        super.onStart();
        RequestQueue queue = Volley.newRequestQueue(this);
        String url ="https://api.fixer.io/latest?base=usd";
        JsonObjectRequest stringRequest = new JsonObjectRequest(Request.Method.GET, url, null,
                new Response.Listener<JSONObject>() {
            @Override
            public void onResponse(JSONObject response) {
                try {
                    Iterator<?> keys = response.getJSONObject("rates").keys();
                    while (keys.hasNext()) {
                        String key = (String) keys.next();
                        currencies.add(key + " -> " + response.getJSONObject("rates").getString(key));
                    }
                } catch (JSONException error) {
                    Log.d("POLYGLOT", error.getMessage());
                }
            }
        }, new Response.ErrorListener() {
            @Override
            public void onErrorResponse(VolleyError error) {
                Log.d("POLYGLOT", error.getMessage());
            }
        });
        queue.add(stringRequest);
    }

    @Override
    public boolean onCreateOptionsMenu(Menu menu) {
        getMenuInflater().inflate(R.menu.menu_main, menu);
        return true;
    }

    @Override
    public boolean onOptionsItemSelected(MenuItem item) {
        int id = item.getItemId();
        if (id == R.id.action_stocks) {
            return true;
        }
        return super.onOptionsItemSelected(item);
    }
}
Most of the code above came with the template that was used when Android Studio created our project. If you look carefully, we have some changes in the onCreate method as follows:
@Override
protected void onCreate(Bundle savedInstanceState) {
    super.onCreate(savedInstanceState);
    setContentView(R.layout.activity_main);
    Toolbar toolbar = (Toolbar) findViewById(R.id.toolbar);
    setSupportActionBar(toolbar);

    final ListView listview = (ListView) findViewById(R.id.currencyList);
    final ArrayAdapter adapter = new ArrayAdapter(this,
            android.R.layout.simple_list_item_1, currencies);
    listview.setAdapter(adapter);
}
In the above we are obtaining a reference to the list found in the UI. We are also attaching a basic ArrayAdapter which will bind data found in an ArrayList to the list. Essentially the ArrayList data is what we get back from the API.
Jumping down to the onStart method, we have something a little more complex:
@Override
protected void onStart() {
    super.onStart();
    RequestQueue queue = Volley.newRequestQueue(this);
    String url ="https://api.fixer.io/latest?base=usd";
    JsonObjectRequest stringRequest = new JsonObjectRequest(Request.Method.GET, url, null,
            new Response.Listener<JSONObject>() {
        @Override
        public void onResponse(JSONObject response) {
            try {
                Iterator<?> keys = response.getJSONObject("rates").keys();
                while (keys.hasNext()) {
                    String key = (String) keys.next();
                    currencies.add(key + " -> " + response.getJSONObject("rates").getString(key));
                }
            } catch (JSONException error) {
                Log.d("POLYGLOT", error.getMessage());
            }
        }
    }, new Response.ErrorListener() {
        @Override
        public void onErrorResponse(VolleyError error) {
            Log.d("POLYGLOT", error.getMessage());
        }
    });
    queue.add(stringRequest);
}
In the above we are using Volley to hit the Fixer API. We are taking the JSON result and adding each key-value pair to the ArrayList that is bound to our UI. Again, for more information on using Volley, check out the previous tutorial that I wrote.
Since the Android project uses the internet to gather remote data, we need to add application permissions. Within the project’s AndroidManifest.xml file, include the following permission:
<uses-permission android:name="android.permission.INTERNET" />
If you try to run the project in a simulator or on your device, it should look something like the following animated image.
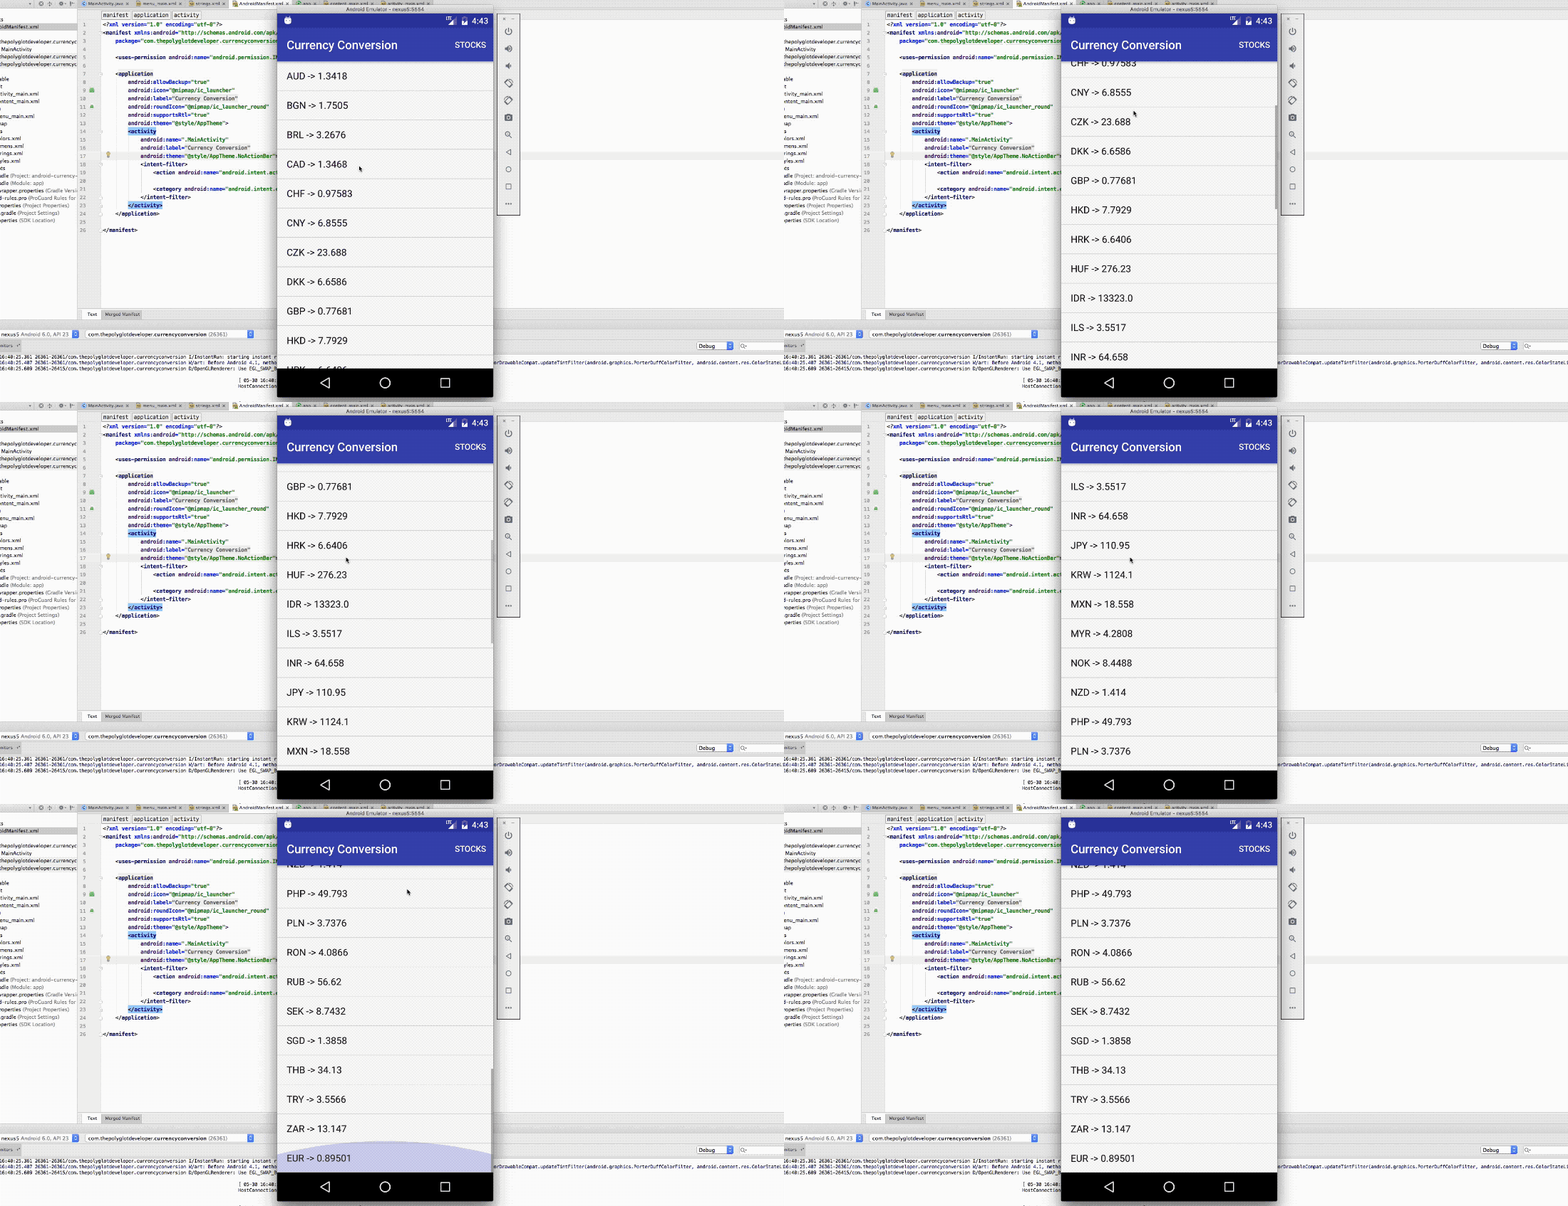
When the application loads we can see the various currencies as well as a menu item. A look into the future will tell us that the menu item will open a NativeScript Activity.
Creating a Stock Quote Tracker with NativeScript and Angular
Like I had previously mentioned, I explored how to get stock quotes via NativeScript and Angular in a tutorial I had written on the Telerik Developer Network. You can download that project or follow the steps that were outlined. However, that project is overkill for what we want to accomplish. Instead, it would benefit us to define a few market symbols rather than doing it via user input. If you really want user input, I suggest you follow the other guide as it doesn’t really move this particular story along.
From the NativeScript CLI, execute the following to create a new NativeScript with Angular project:
tns create ns-stock-ticker --ng
The --ng in the above command indicates that we are creating an Angular project rather than a NativeScript Core project.
With a fresh project created, we’re going to pick and pull from the Telerik Developer Network article. Open the project’s app/app.component.ts file and include the following TypeScript code:
import { Component } from "@angular/core";
import { Http } from "@angular/http";
import "rxjs/Rx";

@Component({
    selector: "ns-app",
    templateUrl: "app.component.html",
})
export class AppComponent {

    public stocks: Array<any>;

    public constructor(private http: Http) {
        this.stocks = [];
    }

    public ngOnInit() {
        let symbols = ["MSFT", "AAPL", "PRGS"];
        for(let i = 0; i < symbols.length; i++) {
            this.getQuote(symbols[i]);
        }
    }

    public getQuote(ticker: string) {
        this.http.get("http://dev.markitondemand.com/MODApis/Api/v2/Quote/json?symbol=" + ticker)
            .map(result => result.json())
            .subscribe(result => {
                this.stocks.push(result);
            }, error => {
                console.log("ERROR: ", error);
            });
    }

}
In the above TypeScript we are providing a static list of symbols and we are using the Markit On Demand API to get information about them. Any information we retrieve will be added to the stocks variable that is bound to the NativeScript UI. The UI that pairs to this TypeScript can be found in the project’s app/app.component.html file. Open it and include the following HTML markup:
<ActionBar title="Stock Ticker"></ActionBar>
<GridLayout>
    <ListView [items]="stocks" class="list-group">
        <ng-template let-stock="item">
            <GridLayout rows="auto, auto" columns="*, auto" class="list-group-item">
                <Label class="h2" text="{{ stock.Symbol }}" row="0" col="0"></Label>
                <Label text="{{ stock.Name }}" row="1" col="0"></Label>
                <Label text="{{ stock.LastPrice }}" row="0" col="1"></Label>
            </GridLayout>
        </ng-template>
    </ListView>
</GridLayout>
This just loops over our list of quotes and displays them on the screen. Because we’re using the Angular HTTP module, it needs to be included with the other Angular modules. Open the project’s app/app.module.ts file and include the following:
import { NgModule, NO_ERRORS_SCHEMA } from "@angular/core";
import { NativeScriptModule } from "nativescript-angular/nativescript.module";
import { NativeScriptHttpModule } from "nativescript-angular/http";
import { AppRoutingModule } from "./app.routing";
import { AppComponent } from "./app.component";

import { ItemService } from "./item/item.service";
import { ItemsComponent } from "./item/items.component";
import { ItemDetailComponent } from "./item/item-detail.component";

@NgModule({
    bootstrap: [
        AppComponent
    ],
    imports: [
        NativeScriptModule,
        NativeScriptHttpModule,
        AppRoutingModule
    ],
    declarations: [
        AppComponent,
        ItemsComponent,
        ItemDetailComponent
    ],
    providers: [
        ItemService
    ],
    schemas: [
        NO_ERRORS_SCHEMA
    ]
})
export class AppModule { }
The above TypeScript is a bit overkill as most of it came with our downloaded template. We’ve only added information regarding HTTP to this file.
With the logic, UI, and modules in place, the end result should look something like the following:
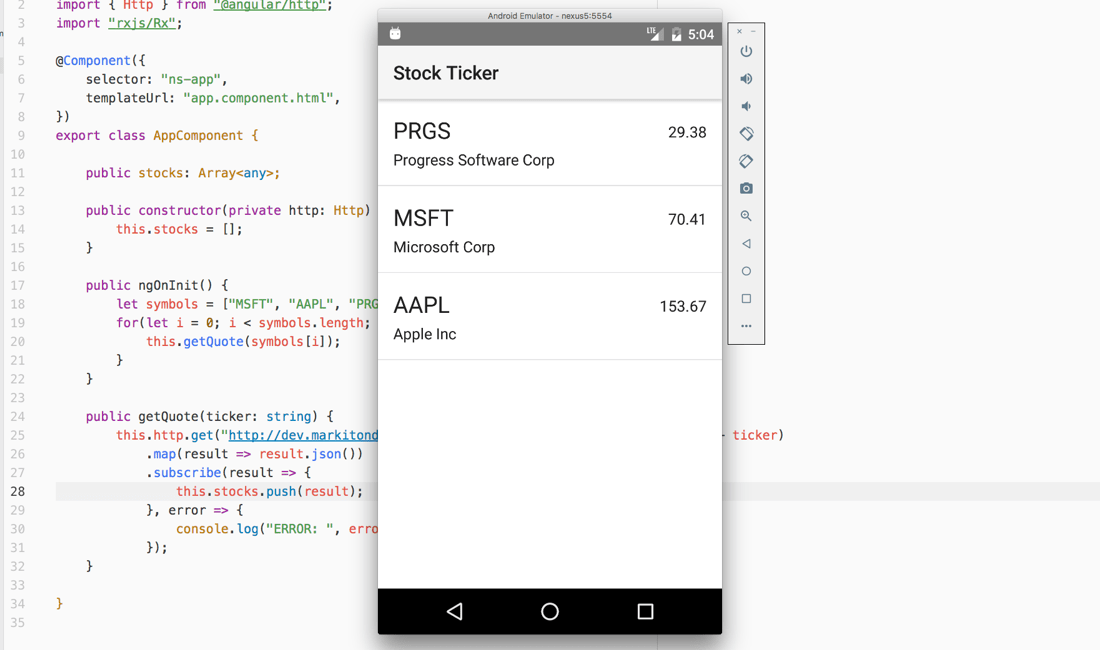
It is nicely formatted and solves our problem when it comes to quote information. So what if your company needs the stock application created by Angular developers, integrated with the currency application created by Java developers? This is where the real magic happens!
Extending the Legacy Android with Java Application to Include the NativeScript Components
When learning how to extend Android with Java applications to support NativeScript, I initially took a look at an old example in the NativeScript documentation. It was enough to get me started, but it had a ton of holes in it. We’re going to get this working without any of the hassle.
For our goals to be accomplished, the NativeScript application must first be built for Android. This can be accomplished by executing the following from within your NativeScript project:
tns build android
Building the NativeScript project gives us a bunch of great things in the platforms directory of our NativeScript project.
At this point we need to start copying files from our NativeScript project into our Android Studio project. Copy the ns-project/platforms/android/src/main/assets directory into the android-project/app/src/main directory.
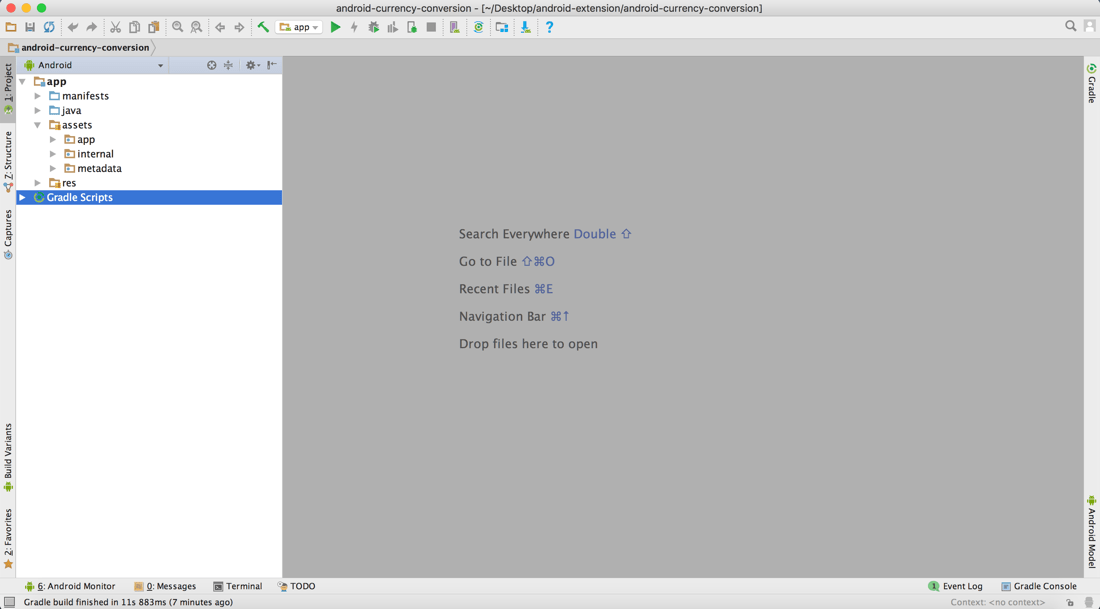
The assets directory contains all of the compiled TypeScript code which will play an important role in the finished Android project. We also need to copy over the compiled Java classes that were created when we built the NativeScript project for Android.
Now we need to copy the NativeScript ns-project/platforms/android/src/main/java/com/tns directory to the Android Studio android-project/app/src/main/java/com directory.
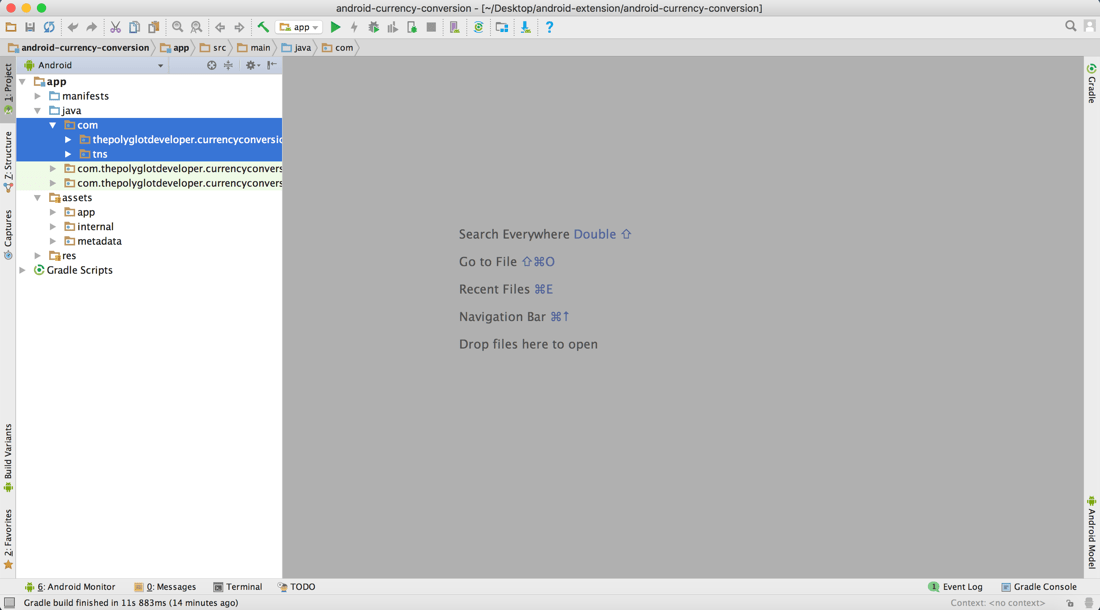
You can see the trend here on how we’re copying NativeScript content. It is aligning with what we have in the Android Studio project.
There are two Android modules that NativeScript uses and they contain various classes among other necessary things. These AAR files must be copied and referenced in our Android Studio project, otherwise the next steps will throw many compile time errors. We can’t just copy and paste like we did in the previous steps. Instead these modules need to be added via Android Studio.
Choose File -> New -> New Module… from the menu in Android Studio.
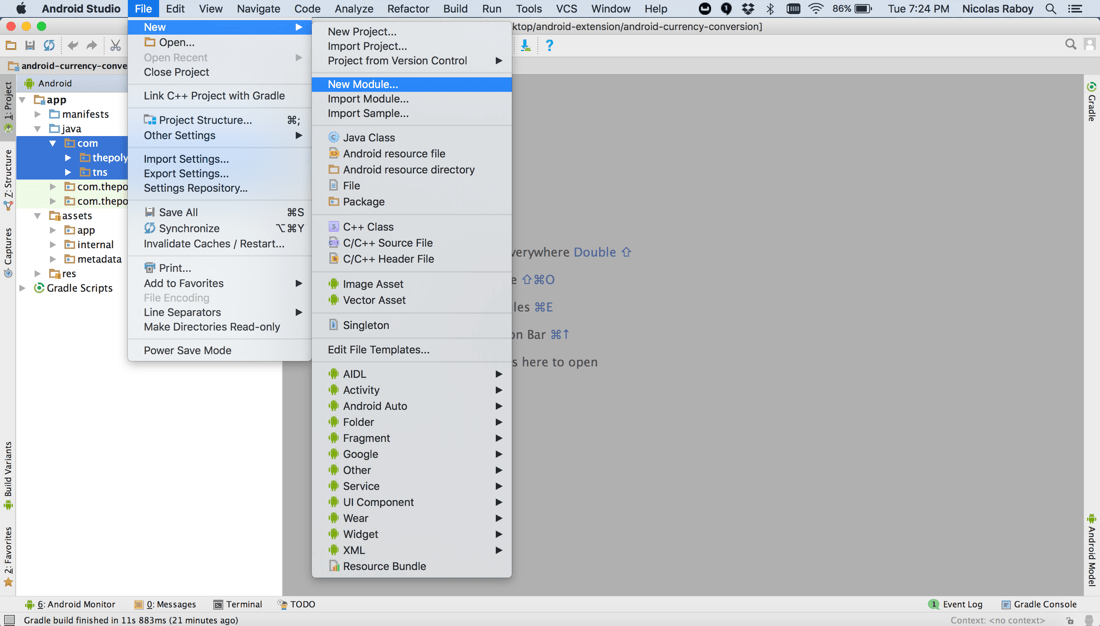
We’re not actually creating a new module, but instead importing an already existing AAR library. This will need to be done for both the NativeScript widgets-release.aar and nativescript.aar files.
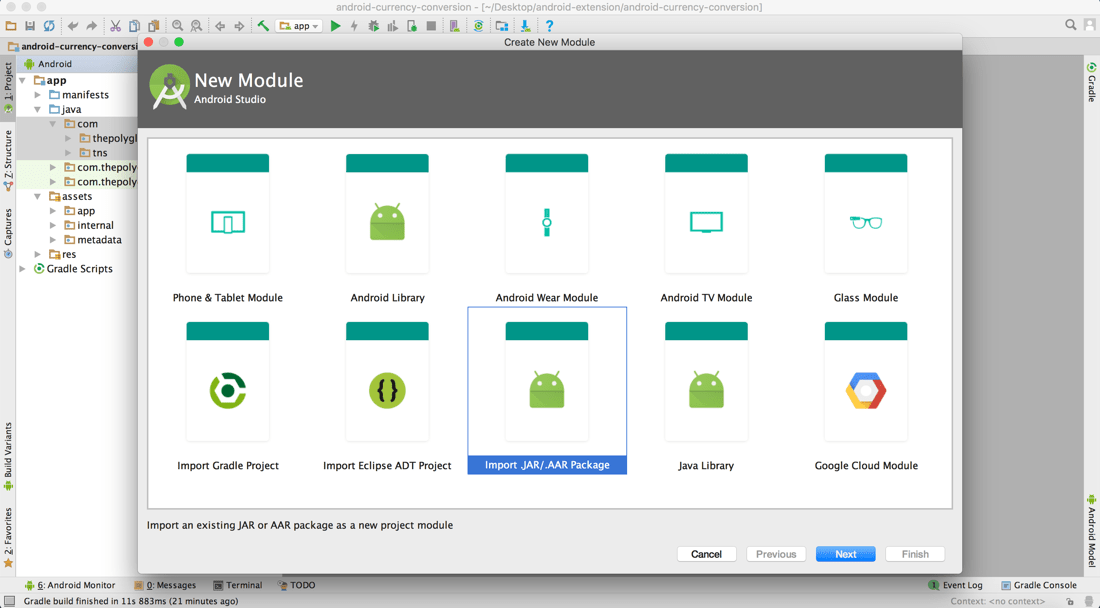
When prompted, find each of the AAR files. The nativescript.aar file can be found at ns-project/platforms/android/libs/runtime-libs/nativescript.aar and the widgets-release.aar can be found at ns-project/platforms/android/src/F0/widgets-release.aar.
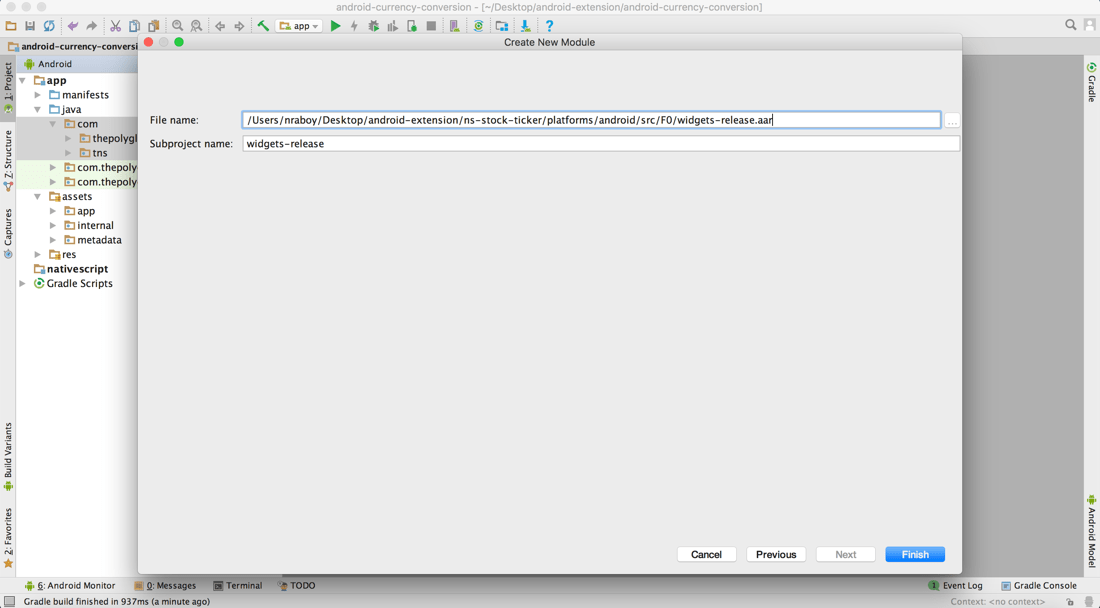
While each of the two modules have been added to the Android Studio project, we need to tell Gradle to include them in the compile process to avoid missing class errors.
Open the Android Studio project’s Gradle Scripts/build.gradle file for the app module and add the following:
dependencies {
    ...
    compile 'com.android.volley:volley:1.0.0'
    compile project(':nativescript')
    compile project(':widgets-release')
    ...
}
Try to build the project. We’re not done, but at least we shouldn’t get any errors.
This is where things can get a little weird. We need to create some helper files that link the two projects together. We’re not adding code to be able to navigate between the projects, we’re only adding code to link them.
Create an android-project/app/src/main/java/com/thepolyglotdeveloper/currencyconversion/MyCustomNativeScriptActivity.java file within your Android Studio project. This file should contain the following:
package com.thepolyglotdeveloper.currencyconversion;

import android.content.Intent;
import android.os.Bundle;
import com.tns.JavaScriptImplementation;

@JavaScriptImplementation(javaScriptFile = "./MyCustomNativeScriptActivity.js")
public class MyCustomNativeScriptActivity extends android.app.Activity {
    public MyCustomNativeScriptActivity(){
        com.tns.Runtime.initInstance(this);
    }

    @Override
    protected void onCreate(Bundle savedInstanceState) {
        com.tns.Runtime.callJSMethod(this, "onCreate", void.class, new Object[]{savedInstanceState});
    }

    @Override
    protected void onSaveInstanceState(Bundle outState) {
        com.tns.Runtime.callJSMethod(this, "onSaveInstanceState", void.class, new Object[]{outState});
    }

    @Override
    protected void onStart() {
        com.tns.Runtime.callJSMethod(this, "onStart", void.class, null);
    }

    @Override
    protected void onStop() {
        com.tns.Runtime.callJSMethod(this, "onStop", void.class, null);
    }

    @Override
    protected void onDestroy() {
        com.tns.Runtime.callJSMethod(this, "onDestroy", void.class, null);
    }

    @Override
    public void onBackPressed() {
        com.tns.Runtime.callJSMethod(this, "onBackPressed", void.class, null);
    }

    @Override
    public void onRequestPermissionsResult(int requestCode, String[] permissions, int[] grantResults) {
        com.tns.Runtime.callJSMethod(this, "onRequestPermissionsResult", void.class, new Object[]{requestCode, permissions, grantResults});
    }

    @Override
    protected void onActivityResult(int requestCode, int resultCode, Intent data) {
        com.tns.Runtime.callJSMethod(this, "onActivityResult", void.class, new Object[]{requestCode, resultCode, data});
    }
}
Make sure to match the package at the top to that of your actual package. To be clear, the above file was taken from the GitHub repository used in the official documentation. Make sure to create an android-project/app/src/main/java/com/thepolyglotdeveloper/currencyconversion/MyCustomNativeScriptFragment.java file in the Android Studio project as well, with the following Java code:
package com.thepolyglotdeveloper.currencyconversion;

import android.animation.Animator;
import android.os.Bundle;
import android.support.annotation.Nullable;
import android.view.LayoutInflater;
import android.view.View;
import android.view.ViewGroup;
import com.tns.JavaScriptImplementation;

@JavaScriptImplementation(javaScriptFile = "./MyCustomNativeScriptFragment.js")
public class MyCustomNativeScriptFragment extends android.app.Fragment {
    public MyCustomNativeScriptFragment(){
        com.tns.Runtime.initInstance(this);
    }

    @Override
    public void onHiddenChanged(boolean hidden) {
        com.tns.Runtime.callJSMethod(this, "onHiddenChanged", void.class, new Object[]{hidden});
    }

    @Override
    public Animator onCreateAnimator(int transit, boolean enter, int nextAnim) {
        return (Animator)com.tns.Runtime.callJSMethod(this, "onCreateAnimator", Animator.class, new Object[]{transit, enter, nextAnim});
    }

    @Override
    public void onCreate(Bundle savedInstanceState) {
        com.tns.Runtime.callJSMethod(this, "onCreate", void.class, new Object[]{savedInstanceState});
    }

    @Nullable
    @Override
    public View onCreateView(LayoutInflater inflater, ViewGroup container, Bundle savedInstanceState) {
        return (View)com.tns.Runtime.callJSMethod(this, "onCreateView", View.class, new Object[]{inflater, container, savedInstanceState});
    }

    @Override
    public void onSaveInstanceState(Bundle outState) {
        com.tns.Runtime.callJSMethod(this, "onSaveInstanceState", void.class, new Object[]{outState});
    }

    @Override
    public void onDestroyView() {
        com.tns.Runtime.callJSMethod(this, "onDestroyView", void.class, null);
    }

    @Override
    public void onDestroy() {
        com.tns.Runtime.callJSMethod(this, "onDestroy", void.class, null);
    }

    @Override
    public String toString() {
        return (String)com.tns.Runtime.callJSMethod(this, "toString", String.class, null);
    }
}
Just like with the previous, make sure you have the correct package, otherwise you’ll get class related errors.
You might have noticed that each of these two Java files reference a JavaScript file. We need to copy each of the two referenced files.
Create an android-project/app/src/main/assets/app/MyCustomNativeScriptActivity.js file within the Android Studio project with the following JavaScript code:
var frame_1 = require("ui/frame");
require("./MyCustomNativeScriptFragment");
var MyCustomNativeScriptActivity = (function (_super) {
    __extends(MyCustomNativeScriptActivity, _super);
    function MyCustomNativeScriptActivity() {
        _super.call(this);
        return global.__native(this);
    }
    MyCustomNativeScriptActivity.prototype.onCreate = function (savedInstanceState) {
        if (!this._callbacks) {
            frame_1.setActivityCallbacks(this);
        }
        this._callbacks.onCreate(this, savedInstanceState, _super.prototype.onCreate);
    };
    MyCustomNativeScriptActivity.prototype.onSaveInstanceState = function (outState) {
        this._callbacks.onSaveInstanceState(this, outState, _super.prototype.onSaveInstanceState);
    };
    MyCustomNativeScriptActivity.prototype.onStart = function () {
        this._callbacks.onStart(this, _super.prototype.onStart);
    };
    MyCustomNativeScriptActivity.prototype.onStop = function () {
        this._callbacks.onStop(this, _super.prototype.onStop);
    };
    MyCustomNativeScriptActivity.prototype.onDestroy = function () {
        this._callbacks.onDestroy(this, _super.prototype.onDestroy);
    };
    MyCustomNativeScriptActivity.prototype.onBackPressed = function () {
        this._callbacks.onBackPressed(this, _super.prototype.onBackPressed);
    };
    MyCustomNativeScriptActivity.prototype.onRequestPermissionsResult = function (requestCode, permissions, grantResults) {
        this._callbacks.onRequestPermissionsResult(this, requestCode, permissions, grantResults, undefined);
    };
    MyCustomNativeScriptActivity.prototype.onActivityResult = function (requestCode, resultCode, data) {
        this._callbacks.onActivityResult(this, requestCode, resultCode, data, _super.prototype.onActivityResult);
    };
    MyCustomNativeScriptActivity = __decorate([
        JavaProxy("com.thepolyglotdeveloper.currencyconversion.MyCustomNativeScriptActivity")
    ], MyCustomNativeScriptActivity);
    return MyCustomNativeScriptActivity;
}(android.app.Activity));
//# sourceMappingURL=activity.js.map
The above code was taken from the NativeScript GitHub repository referenced in the documentation. Take note that the Android Activity referenced in JavaProxy was changed to match that of our actual project.
Likewise, you’ll need the matching Fragment file. Create an android-project/app/src/main/assets/app/MyCustomNativeScriptFragment.js file in the Android Studio project with the following JavaScript code:
var frame_1 = require("ui/frame");
var MyCustomNativeScriptFragment = (function (_super) {
    __extends(MyCustomNativeScriptFragment, _super);
    function MyCustomNativeScriptFragment() {
        _super.call(this);
        return global.__native(this);
    }
    MyCustomNativeScriptFragment.prototype.onHiddenChanged = function (hidden) {
        this._callbacks.onHiddenChanged(this, hidden, _super.prototype.onHiddenChanged);
    };
    MyCustomNativeScriptFragment.prototype.onCreateAnimator = function (transit, enter, nextAnim) {
        var result = this._callbacks.onCreateAnimator(this, transit, enter, nextAnim, _super.prototype.onCreateAnimator);
        return result;
    };
    MyCustomNativeScriptFragment.prototype.onCreate = function (savedInstanceState) {
        if (!this._callbacks) {
            frame_1.setFragmentCallbacks(this);
        }
        this.setHasOptionsMenu(true);
        this._callbacks.onCreate(this, savedInstanceState, _super.prototype.onCreate);
    };
    MyCustomNativeScriptFragment.prototype.onCreateView = function (inflater, container, savedInstanceState) {
        var result = this._callbacks.onCreateView(this, inflater, container, savedInstanceState, _super.prototype.onCreateView);
        return result;
    };
    MyCustomNativeScriptFragment.prototype.onSaveInstanceState = function (outState) {
        this._callbacks.onSaveInstanceState(this, outState, _super.prototype.onSaveInstanceState);
    };
    MyCustomNativeScriptFragment.prototype.onDestroyView = function () {
        this._callbacks.onDestroyView(this, _super.prototype.onDestroyView);
    };
    MyCustomNativeScriptFragment.prototype.onDestroy = function () {
        this._callbacks.onDestroy(this, _super.prototype.onDestroy);
    };
    MyCustomNativeScriptFragment.prototype.toString = function () {
        return this._callbacks.toStringOverride(this, _super.prototype.toString);
    };
    MyCustomNativeScriptFragment = __decorate([
        JavaProxy("com.thepolyglotdeveloper.currencyconversion.MyCustomNativeScriptFragment")
    ], MyCustomNativeScriptFragment);
    return MyCustomNativeScriptFragment;
}(android.app.Fragment));
frame_1.setFragmentClass(MyCustomNativeScriptFragment);
//# sourceMappingURL=fragment.js.map
Just to summarize what we just did. We took four files from the NativeScript documentation. An Android and JavaScript file for Fragments as well as an Android and JavaScript file for Activities. From what I’ve found, these files will be consistent in any Android with NativeScript polyglot project as long as you change the packages and classes to match that of your own.
Like with any Android Activity, it needs to be added to the AndroidManifest.xml file. The AndroidManifest.xml file should include the following line:
<activity android:name=".MyCustomNativeScriptActivity" />
Like previously mentioned, we’ve only linked NativeScript with Android as of now. We’re not actually navigating from Android to NativeScript. To do this, consider the following within the Android Studio project’s android-project/app/src/main/java/com/thepolyglotdeveloper/currencyconversion/MainActivity.java file:
public void openNativeScriptActivity() {
    com.tns.Runtime runtime = com.tns.RuntimeHelper.initRuntime(MainActivity.this.getApplication());
    if(runtime != null) {
        runtime.run();

        android.content.Intent intent = new android.content.Intent(MainActivity.this, MyCustomNativeScriptActivity.class);
        intent.setAction(android.content.Intent.ACTION_DEFAULT);
        startActivity(intent);
    }
}
The above method will launch our NativeScript Activity from within the Android project. However, we need to call this method first. It makes sense to use our menu item.
@Override
public boolean onOptionsItemSelected(MenuItem item) {
    int id = item.getItemId();
    if (id == R.id.action_stocks) {
        openNativeScriptActivity();
        return true;
    }
    return super.onOptionsItemSelected(item);
}
Try to compile and run the application now. If all went well, you should have your original Android application, now with NativeScript components.
Conclusion
You just saw how to extend your legacy Android with Java applications to include NativeScript with Angular components. This is incredibly useful if you’ve got a dedicated Android team, but could use some help from your web developers. It saves you the trouble of having to port everything to NativeScript.
Much of this tutorial was inspired by the NativeScript documentation, but it included topics such as Volley and NativeScript with HTTP as seen in previous tutorials that I wrote about.

